SAP ABAP EDI Inbound ProcessTesting

To check weather the electronic data interface of SAP is working properly or not we do have different test to do.

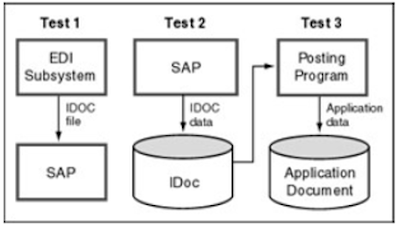
We do test various components of SAP ABAP EDI Inbound process and they are
  1. The inbound triggering process ·
  2. The successful creation of IDocs in the database ·
  3. The posting of the application document.
A multitude of errors can be related to data errors. Detailed information about a specific error is also logged in the status record, and an error workflow is started to notify the person responsible for handling the error. If your posting program uses the Call transaction to post the document, you can step through every screen to determine the exact location of the error.


This can be shown diagrammatically as shown below.


How do we Verify the Inbound Triggering Process ?

This step tests the connectivity between the subsystem and the SAP system.This test requires the process to begin at the OS layer using an IDoc file.

The results of executing the startrfc command are displayed at the command line where you started the program. The errors are usually from message class E0. If you see a message with E0, you can use transaction SE91 to look up the details of the message. If the error message is unclear, you can turn on the trace when executing startrfc to view detailed information.

The problems in this test could be

1.Permission problems in executing the startrfc command. You must have proper authorization to execute operating system commands.

2· Problems with input parameters. The parameters must be specified according to the syntax. It may be the user ID and passwords have problems. You can use your logon ID to test the process.

3·Problems with the gateway services. You can use transaction SMGW to check the status of your gateway services. Gateway services are used for every CPI−C communication, and RFC is implemented using CPI−C protocols. Check with your Basis staff for appropriate gateway service
values.

4·Problems accessing the inbound file. The file system, if NFS mounted, might not be available, or SAP does not have authorization to read the file.

5· If this step is successful, an IDoc should be created in the SAP database .and don't bother errors in the IDoc at this stage. The scope of this test is limited to ensuring that the triggering process works.

How to Verify the Creation of Successful IDocs ?

In this step, we use the information in the IDoc's control record to verify that a partner profile is found and that the IDoc is created without any structural errors. This step is useful for custom IDocs when you want to make sure that the incoming IDocs are structurally correct.

Here we have to start the inbound process with one of the utilities and shall not start from a file.

The results are logged in the IDoc's status records. You can display the status records by using the IDoc display utilities. If an error occurs, the IDoc gets a status code of 56 (IDoc with Errors Added), and an error workflow is started.

The person notified in this case depends on whether a partner profile could be read. If a partner profile was found, workflow is sent to the person specified in the partner profile. If a partner profile entry could not be read, the message is sent to the IDoc administrator.

Common problems in this step are related to data in the control record and to syntax errors in the IDoc. The parameters in the control record must match the key of the partner profile record for that inbound message.

The status records should give you the specific details. If this step is successful, you will see an IDoc that has a status code of 64 (IDoc Ready to Be Passed to Application).

How to Verify the Posting of Application Documents?

The transaction code is BD87.

The logic for posting an application document is coded in inbound function modules. Verifying the logic of the inbound function module is the most important step for custom function modules. You verify not only that the posting function module is working correctly, but also that the logic and interface of the function module are correct. If problems exist, you might also want to debug the process one step at a time.

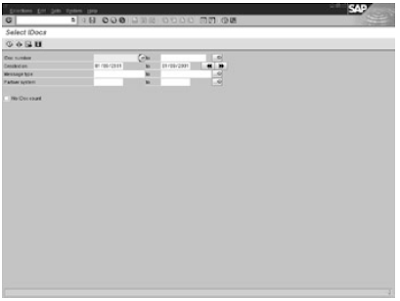
The IDoc created in the "Verifying the Creation of Successful IDocs" section is used to test this process. To start, execute program RBDAPP01 via SE38, or execute BD87. Then, enter your IDoc number and start the process. The selection screen for the RBDAPP01 program appears in Figure below.
Errors in this step are mainly related to data errors and are logged in the status records of the IDoc. You can display the status records by using the IDoc display utilities. The IDoc gets a status code of 51 (IDoc with Errors Added).

The common problems in this step are either data related or in the application configuration, so you must make sure that the data values are correct in the data record fields. Check your program logic for any errors.

If this step is successful, an application document is created, and the IDoc gets a status code of 53 (Application Document Posted). The document number is logged in the status record. For example, if an incoming IDoc creates a sales order number 10000, this number appears in the last status record.

The previous post deals with SAP ABAP EDI Inbound process utilities.

The previous post of the blog deals with EDI Testing outbound process.

SAP EDI Inbound Process Utilities

SAP EDI inbound process do have different utilities to test inbound process.They are

1. Start the Inbound Process by Copying an Outbound IDoc as Inbound.
2. Start the Inbound Process from an Inbound Text File.
3. Start the Inbound Process with the Inbound Test Tool.

Let us know about each utilities in detail.

1.Start the Inbound Process by Copying an Outbound IDoc as Inbound is also called the turnaround utility, uses that principle to copy an outbound IDoc file as an inbound IDoc file and start the inbound process. This utility is useful if you already have an outbound process that is generating an IDoc type you want to use for your inbound testing.

we start this utility via transaction WE12. The selection parameters allow you to change the sender and receiver fields, as well as the message type and this utility does not allow you to change the actual data contents. We have to make sure that data in the outbound IDoc can be used for an inbound process. After entering the parameters, click the Execute button. The system displays the following message.

The transaction code to start this utility is WE12 and the menu path to access it is From the Area menu of EDI, choose Test, Inbound procg of modified outb.file.

2. Start the Inbound Process from an Inbound Text File

The transaction code is WE16 and menu path is From the Area menu of EDI, choose Test, Inbound procg of.orig.inb.file.

We can use this utility to start the inbound process from an inbound file, but first, we have to build an inbound file.

Different ways to start in bound process are

1.Copy an existing inbound IDoc in the system, and save the IDoc to a file via transaction WE19, by selecting an existing IDoc number and clicking the Create icon. On the next screen, you can change the values. Then, click the Inbound File button, enter the file name, and deselect the Start IDoc Inbound Processing of File Immediately flag. Click the Continue button, and an IDoc file is created .

2.Copy an outbound file and modify it to look like an inbound file. Alternatively, if you have an outbound file, you can set a breakpoint while executing the turnaround utility. Set the breakpoint where it has copied an outbound file, has modified it to look like an inbound file, and is ready to start the inbound process. At that point, you can end the session. Now you have an IDoc file you can use for your inbound process.

After creating the IDoc file, you can start inbound processing using utility 2. The selection parameters of this program allow you to specify the file name for the inbound IDoc file and then click the Execute button to start the inbound processing.


The previous post of the blog deals with EDI Testing outbound process.


ABAP DICTIONARY OVER VIEW

TABLE TYPES IN ABAP

CHANGES TO DATA BASE TABLES

SAP ABAP EDI Testing Outbound Process part two

We have discussed about SAP ABAP EDI outbound process testing part one and this discussion is in continuation with that.

How do we verify that Idoc is generated or not ?

If we extended the IDoc selection program via user exits, modified it, or created a new one, this step allows you to debug our program logic.Transaction code for testing IDOC generation is WE15 and the menu path is From the Area menu of EDI, choose Test, Outbound from MC.

We can also test this step by executing the RSNAST00 program via transaction SE38 or by directly executing transaction WE15 and it step processes the NAST entries we have created in the preceding step and calls the selection program for that message.For example, IDOC_OUTPUT_ORDERS will be called for message type ORDERS.

After a NAST record has been processed successfully, the record can be resent either by selecting the Send Again check box without creating a new document or by going into the application document again.


If an error occurs during the execution of RSNAST00, it creates an output log that is displayed on the screen and we can also find extended help on each record of the log by clicking the Documentation button.Another possibility is that syntax errors have been found in the IDoc. The IDoc will be in status 26 (Error during Syntax Check of IDoc). We use transaction WE02 to display IDocs in the system. The status record in the IDoc tells you whether syntax errors were generated for the IDoc.

If you are testing a standard SAP−supplied program, errors at this stage are rarely due to program logic. The possible causes of the errors are

1.The partner profile has an incorrect process code. You can perform a syntax check on the partner profile.

2· The application document has been deleted. Display the application document to confirm that the document exists.

3·The application document contains an inconsistency. For example, partner functions might not have been defined.

4· The program logic has errors. If you have developed your own selection program or extended the standard program via user exits, check the program logic for errors.

If this step works correctly, a success message will appear in the output log window and we can then use transaction WE02 to display the IDoc. It must be in status 30 (IDoc Ready for Dispatch).

How to verify Connection between the SAP System and the Subsystem ?

The connection is responsible for the greatest number of problems because it crosses the boundary from SAP to the OS layer. If we successfully tested the components, we won't experience any problems at this juncture.

The transaction code for testing the connnection is WE14 and the menu path: is From the Area menu of EDI, choose Test, Outbound Processing from IDoc.


Learn about SAP ABAP EDI Complete HERE by following the link.

TYPES OF VIEWS IN ABAP

DATA BASE DIALOG

ABAP DATA BASE UPDATE

SAP ABAP EDI Testing Outbound Process

In SAP ABAP EDI Programming previously we have discussed regarding EDI interface testing and here we are going to deal with outbound process testing for EDI.

The outbound process is essentially a sequence of sub processes that link together to form the total process. Five sub processes are tested in the outbound process are
  1. The successful creation of an application document ·
  2. The proposal of output by Message control ·
  3. The generation of IDocs ·
  4. The connection between the SAP system and the subsystem ·
  5. Status reporting by the subsystem

In these test process creation of application document will happen naturally and it itself will show if at all there is any problem in creating the application.

Verifying the Proposal of Output by Message Control

If output (EDI, ALE, or fax) will be proposed automatically via Message control, we must ensure that all the desired outputs are proposed with correct values.

We test this component by executing the application transaction. No tool is available to test the Message control component by itself. The only option is to create an application document and go to the output control screen. In some cases (for example, order change), we have you to go to the Change Document transaction instead of the Create Document transaction.

We have to verify

1.The existence of an output record (if output is to be proposed automatically).
2.If output is to be entered manually, display the list of output types and select your output.
3.The accuracy of the output medium, timing, and language.

If desired outputs (such as EDI, ALE, fax, and print) are not proposed, we have to go to the menu bar on the output control screen, and choose Goto, Determination Analysis to view the output log.

The output log displays the reason for the problem. This log is cryptic,For example, the next−to−last line in the Overview window indicates that the RD00 output has already been processed once and that a subsequent automatic proposal is not allowed.

Common problems that can prevent the output record from being proposed:
  1. The condition record is missing.
  2. The Message control record of the partner profile is missing.
  3. The output type is set to manual.
  4. One of the prerequisites for the conditions was not satisfied in the requirement logic of the Message control.
If the output proposal is working correctly,we must make sure that a NAST entry is created for each of the outputs. To see the NAST entries, execute transaction SE16 or SE17, and enter NAST in the table name. Enter your application document number in the Object Key field, click the Execute button, and verify that a record exists for each output proposed on the output control screen.

Learn about SAP ABAP EDI Complete HERE by following the link.

SEARCH HELP

DEPENDENCIES OF DICTIONARY OBJECTS

PERFORMANCE DURING TABLE ACCESS

SAP ABAP EDI Complete Course

EDI is the electronic exchange of business documents between the computer systems of business partners, using a standard format over a communication network. EDI is also called paperless exchange. Learn here the complete configuration of SAP ABAP EDI configuration with complete screen shots and detail lessons. For the convenience the whole topic is divided into several parts so that you can have your own plan to go through the entire topic or look into some thing where you are having issues.

This list of EDI topics will be keep growing and hence book mark this page and keep visiting back.

Your comments are welcome and they give me a better idea that what is your expectation is and thank you for spending your time here.

What is EDI an introduction
Business process with EDI
EDI process components part one and two
EDI architecture introduction
Outbound process overview
Inbound process over view
What is a Idoc?
Outbound process overview
Outbound process via message control
EDI outbound process
EDI inbound process overview
Inbound process via function module
Inbound process via work flow
EDI subsystem part one and twoEDI Subsystem architecture and mapping
EDI basic components configuration part one and two
How to set RFC destination part two and part oneDefining a port for message control
EDI Outbound process
Inbound process
Partner profiles configuration part one and two
Overview of outbound parameters part one and two
EDI outbound parameters for message control
EDI inbound parameter views
Partner profile maintenance
Message control Configuration
Message control architecture part one and two
EDI output types part one and twoMessage control and control table
Working of message control part one and two
Message control set up
Work flow management
Using work flow
Architecture of work flow
Business objects
EDI Tasks and roles
Work item and SAP IN box
Error notification process part one and two
Work item in EDI Work flow
EDI Work flow part one, two, three and four
EDI Interface testing
Out bound testing for EDI and part two
Inbound Process utilities
Inbound process testing for EDI
SAP Inbox work item processing
SAP Inbox process log
Idoc's Information display part two and Three
Work Flow display and WORK LOAD analysis on sap SYSTEM AND part two
SAP System logs and analysis part one and two
EDI trouble shooting and Electronic data interchange trouble shooting part twoSAP EDI process restart with ALE tools
EDI Tools for SAP
EDI performance factors
SAP ABAP EDI out bound process scenarios examples
Outbound process with message control with example
Outbound process with out message control with scenario
With out message control edi with example
EDI with message control scenario with purchase order and part two


SAP ABAP EDI Interface Testing

While we are working with SAP and its programming language ABAP, its advanced concepts like EDI will be very useful in communicating SAP with third party software suing EDI. It is widely used to simplify the process. Here we are going to discuss how do we SAP ABAP test the EDI interface.

Testing the Outbound Process

The outbound process is relatively simple to test, and requires the least simulation because the process originates in SAP and all the major components reside in SAP. The best approach for testing an outbound process is to first test each component, and then test the whole process.

Types of Test Utilities

Utilities for a sanity test performs a basic sanity test on the configuration of EDI objects such as the partner profile, port definition, and RFC destination parameters. A sanity test enables you to test a component without executing the actual process. For example, you do not have to execute the purchase order process to test the accuracy of settings in the partner profile. You can access these utilities from within the maintenance screens of the objects.

We can test the outbound process using the actual components involved in the process. The only piece that can be missing is the subsystem. A utility in the standard system simulates the functionality of the subsystem, which is to report the process status to the SAP system.

Prerequisites for Testing an Outbound Process

The outbound process is composed of programs that are linked to run one after another. To test each component separately, we have to make the following settings to ensure that the components are disconnected from each other and do not start the next process immediately.

If our application uses Message control, the timing of the output type should be set to 1 (Run with the Next Selection of RSNAST00) in the condition records. This setting causes the RSNAST00 program not to run immediately after creating an entry in the NAST table.

In the partner profile, set the Collect IDocs flag and the Do Not Start the Subsystem flag. These settings cause the RSEOUT00 program not to run immediately after an IDoc is created in the system.

Testing the Partner Profile

We can test partner profiles to make sure that the parameters specified are still correct. The checks are carried out are

The process code
The user to be notified
Message control consistency with outbound parameters

To check the consistency of partner profiles, we can execute the program RSECHK07. You can do this via transaction SE38 or from the menus of the initial partner profile screen. The output is a color coded report that shows the details of any problems that were found.

Testing the RFC Destination

This test confirms the connectivity between the computer system on which SAP is running and the system on which the subsystem is or will be installed.

We have to execute transaction SM59 and Click the RFC destination being used in the process. The destination is typically SERVER_EXEC, but confirm your RFC destination by viewing the details of the port definition that will be used for outbound processes. Click the Test button. If the results are positive, the connectivity is working correctly.

If the test connection returns negative results, the message should indicate the problem. If the message is not self−explanatory, you can turn on RFC trace to log every step of the RFC test.

The problem is basically the connectivity between the two systems. The possible causes of errors are

1.The RFC destination is using an explicit host name to reach the destination system, and this name is misspelled.

2.The RFC server program (typically rfcexec) is unreachable; may be this program does not exist on the destination server, or the path is unreachable or inaccessible. The path name and program name are case sensitive. The ID used to access the files is adm, where sid is the system ID.

Testing the Port Definition

This test confirms access to the directory location where the IDoc files will be stored for the inbound and the outbound processes.

Here we have to execute transaction WE21 and select your port definition, and then click the Outbound File button to view the directory location where IDoc files will be stored. Click the Check button on this screen to test accessibility to the directory. If the check is successful, the port definition is correct. Perform a similar operation for the inbound process and the Command file.

If the test connection returns negative results, the message should indicate the problem.

1.The problem involves access to the directory location. Check that the path name is spelled correctly. It is case sensitive, and the directory name must end with a slash.

2.If access to the file system is via NFS (Network File System), the NFS mounts should be v verified from the application server to which you are logged on.

The previous post deals with SAP ABAP WORK FLOW setting using EDI

What is SAP Full form and its definition part one
SAP Full form and introduction part two

SAP architecture,its full form of working and enjoy sap products
SAP Full from and Drive from R/3 to MySAP.com

ABAP Programming EDI Work flow settting part four

The programming language of biggest ERP that is SAP ABAP is good not only customizing data as per the client requirement with reports coding but works very efficiently with back ground integration of business of large companies.

Here work flow automate the process of functioning and notifies the corresponding position when ever error occurs.Previously we had a lot of discussion regarding work flow and especially the previous posts mentioned here.

EDI WORK FLOW for SAP setting it up part one
EDI WORK FLOW for SAP setting it up part two
EDI WORK FLOW for SAP setting it up part three

The present post is in continuation of the above posts and going through them will give convenience in understanding the present post.

Setting Up Notification of Successful Posting

The ALE/EDI interface can be set up to raise an event when an IDoc posts successfully. This option is provided in the settings for an inbound process code. We can attach a single−step task or a work flow to be started when the event is raised.

We have to follow three steps here for that sake.

1.Identify the application object created by the IDoc. You can view the setting in table EDIFCT or execute transaction WE57. A link is defined between a message, a business object, and the function module.

2. Identify the event in the application object that needs to be raised.

3.Execute transaction BD67, select the process code used for the inbound process, and go to the details.
In the application object, enter values for the Object Type and Start Event fields, as identified in Step two.

4.Identify an existing task, or create a new task or work flow that should be started based on the event.

5.Define the event linkage between the event and the work flow. You can also perform this step from the task itself by activating the triggering event.

Connecting the SAP Inbox to a MAPI−Based E−Mail Client

When using workflow, you might want to receive work items through your company's regular e−mail system. The ability to do so is useful to infrequent users of the system who don't want to log on to the SAP system and view their work items on a daily basis. These users can view their work items via their regular e−mail system if the e−mail system is MAPI−compliant.

SAP Labs, a subsidiary of SAP AG, has developed a MAPI connector to link the SAP Inbox to a MAPI−based client such as Microsoft Outlook or Exchange.

During the installation process, the system records the SAP server name, client number, user ID, and password for the SAP system. This information is used to automatically log on to the system to retrieve work items for the e−mail client on a periodic basis.

After the software is installed, a new folder for SAP is created in the e−mail client Inbox. You can click this folder to view the work items. No settings have to be made on the SAP system. Work items continue to reside in the SAP system as well. When a work item is executed, the system automatically logs on to the SAP system and takes you to the screen you normally use when you execute a work item from the SAP Inbox.

Changing Work Item Text

The work item text that appears in the user's Inbox can be customized to the needs of users. This modification is considered a customizing change and will be supported on upgrade. For that

1.Using transaction PFTC_CHG, go to the task for which the text needs to be modified.

2.Choose the Change button

3.Change the work item text to suit your needs. The text can include substitution parameters from the workflow container fields. Put an ampersand in the text, and click the Insert Variables button to select parameters from the container.

Related topics with Complete series of lessons

ALE IDOC complete series
ABAP WORK FLOW complete
ALE Complete
SAP OOPS ABAP PART 1