SAP Inbox Work List

Viewing a Worklist

A work list is a list of work items sent to your SAP Inbox. Click the Workflow node to see a list of all the work items for which you have been selected as the responsible person. The default list has nine columns .
  1. Column 1. Displays an icon indicating that the work item is executable.
  2. Column 2. Gives a short description of the work item.
  3. Column 3. Displays an icon indicating the work item's status.
  4. Column 4. Displays the work item's creation date.
  5. Column 5. Displays the work item's creation time.
  6. Column 6. Indicates the work item's priority.
  7. Column 7. Indicates whether an attachment is associated with this work item. An attachment can be a file, a note, a business document, or any other object the system supports.
  8. Column 8. Indicates that the user must confirm the end of processing.
  9. Column 9. Indicates whether the work item is overdue.

The work list includes a short description of the work item. To see additional details (such as status, long text, terminating event, selected agents, IDoc number), double−click a work item's Description entry or select the work item and click the Display icon.


The Description box on the Basic Data tab is usually blank. As part of workflow customizing, you can change the text that appears in this box. From the menu options on this screen, you can obtain additional information about a work item.

For example, to find out who else received this work item, choose Goto, Agent, Selected Agents. You can also find a work item's technical data, such as the task number. Another important piece of information is the IDoc number, which you find by clicking the Available Objects tab and choosing the Process Objects folder.

he previous post of the blog deals with SAP INBOX and monitoring errors.
and you can go through entire EDI Course here.
EDI SAP Inbox and Monitoring Errors

Previously we have discussed regarding EDI Inbound process testing. Now we are going to deal with Errors monitoring via EDI SAP inbox.

Workflow is useful for detecting errors that are infrequent, unpredictable in timing, and meant for a specific group of people.

For example, assume that you are in charge of handling errors with purchase orders going out to your vendors via EDI. Several purchasing clerks can create purchase orders in the system. You could try to stay up−to−date with the problems by displaying a list of purchase orders created in the system every hour, looking for purchase orders that go via EDI and then checking the status of each output to make sure that the EDI part is correct.

You could devote your entire day to monitoring the system manually and not find a problem, or you could be busy doing something else and end up being accountable for an unresolved error.

The transaction codes are

Transaction (prior to version 4.6): SO01
Transaction (from version 4.6): SBWP
Path: From SAP Easy Access menu, click on Business Workplace icon

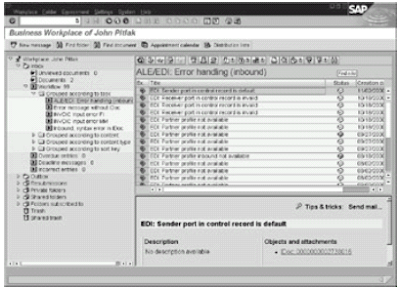
The SAP Inbox is an interface to view and process work items and SAP office documents . It is similar to the inbox of any e−mail system and contains separate folders for the office documents and work items. The office documents are e−mail documents, and the work items are workflow items.

The number next to each folder indicates the number of items in the folder. Workflow items are accessible in any of four folders within the overall Workflow folder. Each folder displays the work items in a different order according to task, content, content type, or sort key.

The work item highlighted in the worklist is displayed in the preview window below the worklist. You can customize this preview window through the use of a user exit.

Understanding Work Items

A work item represents an instance of a task that needs to be executed. For example, a workflow task (Orders_Error) handles application errors in the orders IDoc. When a sales order IDoc has application errors in posting, a work item representing this task is instantiated. A work item has brief text describing its purpose .

A work item is executed from the Inbox to carry out the task, and can have more than one status governing the operations allowed on it.

As part of the ALE/EDI interface, items that can appear in the SAP Inbox. Because work items are intelligently routed to the person responsible for them, the work item's type determines who is notified. You can expect to see work items for the following items.
  1. Errors in the outbound ALE/EDI interface.
  2. Errors in the inbound ALE/EDI interface.
  3. Syntax errors in an IDoc for the outbound process.
  4. Syntax errors in an IDoc for the inbound process.
  5. Application errors in posting an IDoc on the inbound process.
  6. Errors reported by the EDI subsystem.
  7. Technical errors in the EDI interface with reading and deleting IDoc files for the inbound process.
  8. A predefined threshold state exceeded by the number of IDocs. For example, someone is notified
  9. when at least 10 sales order IDocs are not posted because of application errors.
  10. Inbound EDI processes routed via workflow. For example, someone needs to review an order change IDoc before it is posted.
Successful posting of an application document. For example, you want to view invoices whenever
they are successfully posted in the system via EDI.

The previous post of the blog deals with EDI Testing outbound process
and you can go through entire EDI Course here.

LSMW Step by Step in SAP ABAP part Three

In the previous posts we have introduced LSMW and step one and next few steps. Here we are going to deal with further steps of LSMW.

Step Six : Maintain Fixed Values, translations, user-defined Routines

If it is needed to convert a number of legacy fields in a particular way before assigning it to the R/3 field, the conversion rule may be written in the form of a routine and may be re-used.

You may now go back to the previous step and assign these routines to the appropriate fields.

Step seven IN LSMW : Specify Files

Here the file name for the legacy data is to be specified. The file can reside in either user PC or in the Application Server. For background processing, the input file must be located in the Application Server. Access to presentation server files is only possible when you are working online.

For last two (Read & Convert Data), file names are defaulted by SAP and are respectively __.lsmw.read And __.lsmw.conv. You may however change them but it is not recommended.


Step eight : Assign Files

Here the source structures are mapped to the files.


SAP ABAP LSMW program execution :

All the design/configuration steps are now over. The programs for Read & Conversion are now generated by R/3. You may view these but SAP does not allow changing the programs directly.


Periodic Data Transfer

If the object attribute is periodic, it can be run in a periodic schedule. The underlying R/3 program is /SAPDMC/SAP_LSMW_INTERFACE. Only point to note here is that the input legacy file must reside in the Application Server.

You can modify and regenerate the programs from within the LSMW. The programs are /1CADMC/SAP_LSMW_READ_<8> and /1CADMC/SAP_LSMW_CONV_<8> respectively, where <8> is generated by the system.

Next steps are

Prepare the legacy source file : There are various ways of creating the input file for the conversion program from legacy system data. The simplest way is to create a tab delimited text file. If the migration object has more one structures, each will be identified by distinct value of record type identifier (STYPE). This field exists in all the LS & R/3 structures.

It is also possible to combine different files during the data import. If, for example, the data for SAP routing originates in several different files (such as one for the routing, one for associated texts) in your legacy system, you can use the LSM Workbench to easily merge such files into one source file during import.

Read the legacy data from file using the read program : an intermediate file (*.read) is created .

Convert the data using the conversion program which converts the "intermediate file" into the input file for the batch or direct input program (second "intermediate file" - *.conv). The conversion program expects a sequential file stored on the application server as input, which has to meet certain format rules. These rules are defined by the file description and the conversion rules for data migration.

Finally the corresponding Batch or Direct Input program is to be executed. Sometimes these load programs offer test run. Direct Input programs may sometimes use logical file. Logical Path & File may be created using the transaction FILE.


Creation of customer and vendor accounts
SAP Controlling Event Based Posting
Period end closing 

LSMW Step by Step in SAP ABAP part Two

Legacy System Migration work bench(LSMW) for SAP ABAP is introduced in earlier post and in previous post we had a discussion regarding LSMW step one. This post is in continuation with that .

LSMW Step two : Maintain Source Structure

SAP has comprehensive documentation of the load programs (Direct or Batch Input) how the information is to be structured in one or more levels for the business object under consideration.

The Legacy data must be organized in similar fashion in the input file. Data for more that one structures may be available in a single file. Before completing the step, it is recommended to go through the SAP documentation. The source/legacy structures to be mentioned here are only identifiers and do not need to reside in the database dictionary.

Here is a screen shot of displaying source structure.


LSMW Step three : Maintain Source Fields

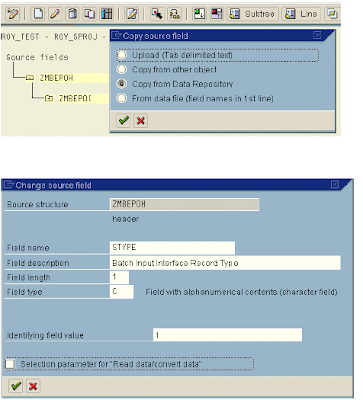
In this step, the source/legacy fields must be entered in each structures. You can use any of the following copy facilities, otherwise, the source field may also be added individually.

In case of multiple structures in the same file, you need to set the value of record type identifier (STYPE) in this step.

LSMW Step Four :Maintain Structure relation

The source/legacy structures must be related to the SAP R/3 structures.

LSMW Step Five : Maintain Field Mapping & Conversion Rules

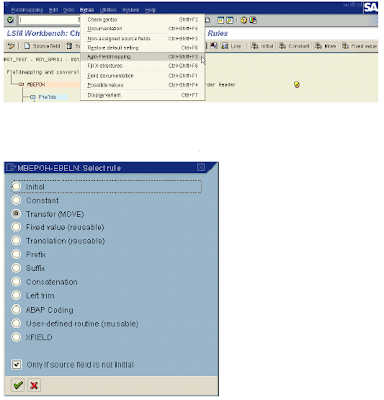
In this step, source/legacy fields in each structure are assigned to R/3 fields. It may be done individually for each R/3 field, which being time-consuming for complex structures or we can use automatic mapping utility (Extras > Auto-Field mapping).

We can specify the conversion rule to be used to convert an LS field into the corresponding R/3 field. For this, use predefined conversion rules or create your own conversion rules in the editor.

You may use the buttons ‘Initial’, ‘Constant’, ‘Move’ & ‘Fixed Value’ to assign different values. You may also assign different rules by using the button ‘Rule’. automatic mapping utility (Extras > Auto-Field mapping).

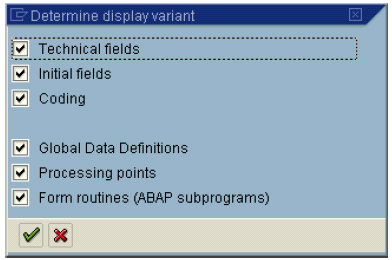
On completion of this step, SAP generates the conversion program. Menu Extras > Display Variants will give further details of the generated programs in the LSMW screens. For further flexibility, you can create global data if you need R/3 table contents and/or variables for the conversion rules and create your own routines.


LSMW Step by Step in SAP ABAP part one

LSMW of SAP ABAP is introduced in the previous post and here we are going to deal step by step.

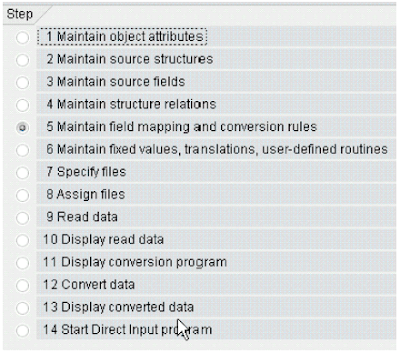
To launch the tool, run the transaction LSMW from SAP.Main Design steps Once you open any existing / new object, the following screen is shown. It details the major steps of completing & running a LSMW object. Design steps are from 1 to 8. Execution steps are from 9. Before you may run the read & convert program, each of design steps is to be finished one by one.


The steps viewed can also be customized using the option Extras > Personal Menu. On selecting and step and closing the window, the step screen (shown above) will change. A few of these options however depend on further attributes set/selected in subsequent steps. Normally the main steps are shown and it can be reset by the button shown in the figure. Therefore the step number shown in the previous figure is subject to change.


Step one in LSMW
: Maintain Object Attribute
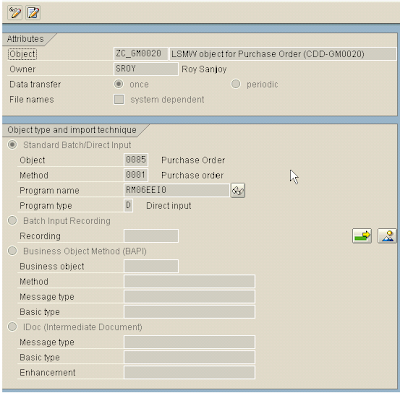
In this step, we configure the basic attributes of data load – e.g. one time or periodic data transfer, which object to load (Vendor Master, Material Master) and its method. SAP provides all the fundamental objects and their associated programs either Direct Input or Batch Input. In few objects, one or more options may be available and you may need to choose which one to go for.


Further, ‘Intermediate Document’ (Idoc) may also be used. If the R/3 System does not provide
any suitable batch or direct input program, you can use the batch input recorder to create a user specific class of migration objects.

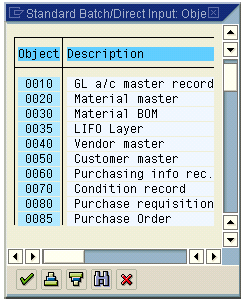
A few objects provided by SAP. The full list may be viewed from the drop-down help.

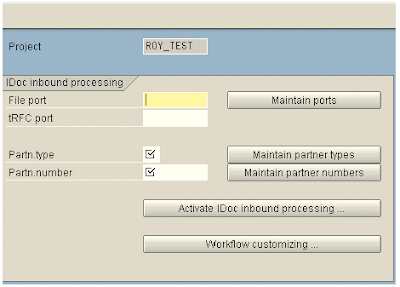
If Idoc is to be used, the information of File Port, Partner type & Partner Number must be provided. The configuration screen may be invoked from the menu Settings > Idoc Inbound Processing in the initial screen of LSMW.


LSMW in SAP ABAP

LSMW means Legacy System Migration Work Bench .SAP offers the Legacy System Migration (LSM) Workbench. The LSM Workbench is a SAP tool that facilitates the process of data transfer from non-SAP system (also called Legacy system) without additional programming to do data conversion. Wecan define the rules for the conversion. The LSM Workbench then generates an ABAP program and thus supports an important step in the process of data transfer.

It is a cross-application component (CA) of the SAP R/3 System and, therefore, is independent from the platform. The tool has interfaces with the Data Transfer Center and with batch input and direct input processing in R/3. The tool can be used in each of the different R/3 releases.
By combining the Data Transfer (DX) Workbench and the Legacy System Migration (LSM) Workbench in SAP Basis component Release 4.6, SAP has made substantial progress towards tackling one of the most costly and time-consuming implementation activities - the migration of legacy systems and the data transfer from ERP systems that are being replaced.
Data migration with the DX Workbench and the LSM Workbench guarantees maximum quality and consistency of your data in the SAP business solution. When data is imported, the system performs the same checks as it does during online entry. The update in your database is performed through the Standard Batch Input Program, Standard Direct Input Program and BAPIs.
Features of LSMW:
 
Instead of individual tables or field contents, the tool transfers complete business data objects (also called object class) such as Material Master, Supplier Master data. A migration object class is a unit combined from the business point of view, which can be used to transfer the data of all the legacy systems defined in the LSMW to the R/3 System.
The migration object class comprises the R/3 structures as well as the program used for data import. The batch and direct input technique is used to ensure consistency of data. For each migration object, a batch or direct input program has to be available in the SAP R/3 System.
The LSMW main functions are :
  • Definition of the legacy system structures and fields
  • Definition of object dependencies and assignment of conversion rules
    The structure and field relationships between the legacy system and the R/3 System are defined in data mapping. The way how data is being processed during migration is determined by the conversion rules.
  • Data conversion
    From the object dependencies, the LSMW generates conversion programs that translate the legacy system data.
  • Data import
    Batch or direct input is used to import the data to the SAP R/3 System.
The additional functions of LSMW are :
  • Spreadsheet interface
    Legacy system data in spreadsheet format can be processed.
  • Host interface
    Legacy system data in a structured data format (that is, with record identifiers and correct sequence) can be processed.
  • Batch input recorder
    The LSMW allows you to use the batch input recorder (shipped with the SAP R/3 standard system) in order to create user-specific classes of migration objects.
  • Automatic check functions
    This function generates and performs value checks against check tables and fixed values specified in the Data Dictionary.

Constraints

The LSMW supports a single and complete transfer of data (initial data load) and also offers a restricted support of permanent interfaces. Thus, a periodic transfer of data is possible. It, however, does not include any functions for monitoring of permanent interfaces. The tool does not support any data export interfaces (outbound interfaces).