Showing posts with label ABAP REPORTS BASICS. Show all posts

Report Painter Report Strecture

With the format presented by the Report Painter, you can easily enter your rows, columns, and general selection criteria.The rows constitute characteristic values or groups.The columns consist of basic key figures (e.g. costs, quantities) with characteristic values for key figures.General data selections are carried out using characteristic values, which are then valid throughout the entire report.To define a report, you must determine the row and column structure and the general data selection criteria.

You can use either a combination of characteristic values or a formula to define a row.Columns contain a combination of a key figure and optional restricting characteristic values. You  can also use predefined columns to display business-relevant combinations of key figures and characteristics, for example, actual costs in the current period, scheduled activity, and so on.

To define rows, you select the characteristics you want to display in these rows and enter the appropriate values. You can enter specific values, intervals of values, or a group. n In the report definition, you can use groups that were created in the master data maintenance.You can use the formula editor to define formula rows. The formulas used can refer to other rows in the same section and to cells selected in the report.

SAP delivers a number of predefined columns for the libraries in Overhead Cost Management. You can copy these predefined columns directly into your reports and change them as required.

One way to define a column is to combine a key figure with several characteristics. n To restrict the characteristics, you can enter intervals or groups as you did when defining single values for the report rows.

Using the formula editor, you can calculate additional columns within a section. The formulas used can refer to other columns in the same section or to cells selected in the report.
 
After you have defined the rows and columns, you can define additional criteria that are valid for the entire report. The additional criteria you select will restrict the data processed in the report. These restrictions are stored in so-called general data selections.

Before a report can be output, it must be included in a report group.A report group is a collection of reports in a library that are executed in one run. Combining several reports in a report group can be useful if the reports are intended to evaluate the same dataset. In this case, the data is only read once and then distributed among the different reports.

You cannot process reports from different libraries in the same report group.When a report group is generated, the system creates ABAP reports, which can then be run. In the first ABAP, inputs are proposed and verified with regard to output parameters, the data source, and extract parameters. In addition, values or sets are proposed for selection, if the report definition contains variables.

In the second ABAP, the data is selected from the database.The last ABAP then formats the data so that it can be output.


When using groups or several single values to define rows, you can define whether only a totals row is to be displayed, or if the complete group hierarchy with subtotals is to be exploded, or if every single value in a row is to be displayed. The system is set up in such a way that only those rows are displayed for which corresponding data exists.If you use a combination of several characteristics in a row block and this row block is exploded, you can choose the hierarchical sequence in which the characteristics are displayed.


SAP ABAP Programming Report on Missing Parts Info System

SAP ABAP programming report on missing parts info system provides a quick recap of material shortages based on reservations that were not fully committed on their requirements date during an availability check. As such, you can use this report to monitor critical components or orders, and to reallocate materials based on inventory availability.

You must check the availability before running this report, since it is based on the results of availability checking. These checks are typically made during order creation or release, but may also be invoked manually. If there is a shortage, the order header will carry the status MSPT and the shortage will be noted in the missing Parts Info listing.

Availability checking parameters must be defined in configuration and may be referenced on various levels including material, order type, and MRP group. Two standard profiles are delivered which provide the basic organization of the report . Additional profiles can be created where needed.

Backorder processing is the key function which may be called up from the primary display of missing parts. It allows you to change the allocation of components. Menu options also provide for branching to the stock overview and stock/requirements list, as well as for display or change of an order.

The first screen provides filters to limit the selection of missing parts from reservations or orders based on single values, ranges, or multiple selection functions for:

Plant
Material
MRP controller
Requirements date
Sales order
Production Order number
Production scheduler (orders only)

At a minimum, the plant must be entered. In addition, the profile which specifies grouping either by material or order must be entered.

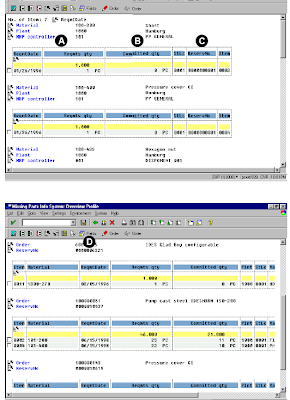
The primary display lists the missing parts—grouped as specified by the profile—and provides the fields listed below (see Example 1). Additions and changes to these fields are possible from the View menu and include:

Material and description
Plant
MRP controller
Requirements date
Requirements quantity
Committed quantity
Storage location
Reservation number
Order number

To access the first screen for this report, choose Logistics → Production → Production control → Control → Information system → Missing parts info system.

1. Enter 1000 in Plant and any other criteria to narrow the selection process.
2. Choose a profile to display the data by material or by manufacturing order.
3. Choose Execute.

The first screen of the report shows data according to the display-bymaterial profile:

A Requirement date and quantity
B Quantity committed to date
C Reservation number

The first screen of the report can also show data according to the alternate profile, display-by-manufacturing order:

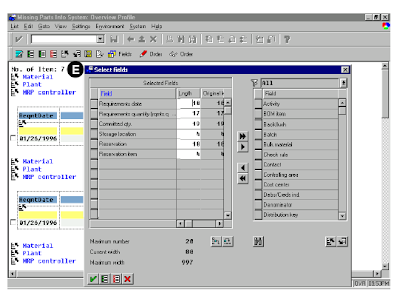
D From either profile, additional fields may be chosen or substituted using the Fields icon.

E The resulting popup window lets you add or delete additional fields.


SAP ABAP Report FICO Profitability and Customer Analysis

This SAP ABAP report deals with finance and control department and is useful to get the Profitability analysis. This report compares sales quantities, gross revenues, and cost of sales for strategic business units, products, and customers. The characteristics available for product analysis include product hierarchies, industries, and divisions, which allow for a summarization of product lines for analysis.

A strategic business unit manager would use this report to monitor the performance of a portion of the business and to analyze which products and customers generate the most profits. Exception reporting and ranking allow quick identification of products that are exceptional performers, as well as poor performers, so that a unit manager can take steps to improve a product’s performance. These features also allow an analysis of the largest customers and the products they purchase, which is useful in planning targeted marketing initiatives for those customers.

You must set the Controlling Area before running the report. Choose Accounting → Controlling → Cost centers → Profitability analysis → Environment → Set operating concern. For the examples in this section, the operating concern is set to IDEA using cost-based profitability analysis.

All reports in profitability analysis are user-defined. This means you must configure and generate the operating concern before creating any reports and determine the rows, columns, variables, and general format by using drill down reporting (forms and reports).

Due to the configuration of this report, you must enter the date range and type of data. If planned data is run in this report, the version must also be specified. The record type is optional.

The profitability analysis line items which list are context sensitive. For example, when you position the cursor on a cell for a line item, only the reports that contain that line item show data. This improves performance of the report as a whole.

Once the original profitability analysis document appears, the original documents related to the line item can be retrieved. For example, from a sales document, a material master, customer master, billing document, and accounting document is available. From a direct financial entry, however, only the cost element and accounting documents are available. From settlement documents, the controlling object from which the settlement took place is generally available.

Two different views are available in this SAP ABAP report:

1. Selected columns run across the report, while the characteristics (products, for example) run down the side.

2. All columns for a single selected product show as rows for a contribution analysis.

You can analyze data using ranking lists, exception reporting, and sorting; list line items in the profitability analysis database; and access additional SAP data from this report.

This report contains data obtained from postings to cost-based CO-PA. As such, the data cannot be changed or manipulated from the report. Since cost-based—not account-based—CO-PA is used, value fields are used in the analysis instead of account numbers or cost elements.

To access the first screen for this report, choose Information systems → Accounting → Profitability analysis Profitability report → Report selection.

From the reporting tree, choose the following report: Istdaten → SBU → Product → Cust. w/out Summ. Levels.

Each term on the screen highlighted is having a meaning as mentioned.

1. Enter 001/1998 in Period from and 012/1998 in Period to. This report includes all periods for a fiscal year and allows reporting across fiscal years.

2. Enter data type 0 in Plan/act.ind.

3. Leave Version blank because it is only required for planned data.

4. Leave Record type blank so that all posted records appear. Record type limits the source of viewable data (for example, data only from invoices, or direct journal entries).

5. Choose Execute.

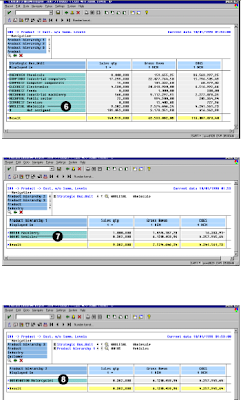
This screen shows data for the strategic business unit. Columns separate the sales quantity, gross revenue, and cost of sales. All postings not assigned to a division, appear in Not assigned in the last row.

6. Double-click on the Wholesale line to select it.

This screen shows the product hierarchy within Wholesale. The Strategic Business Unit is now displayed above the columns, so that the current selection of data is easily visible.

Notice that Product hierarchy 1 was the first characteristic in the Navigation section .

7. Double-click on Vehicles, the second Product hierarchy 1 value, to show the top-most characteristic listed in the Navigation section.

8. Double-click on Motorcycles, the only Product hierarchy 2 value.


Related Posts:

SAP ABAP fico report profitability analysis report 

 My sapcrm customers and consumer segmentation
Organizational challenges in crm and mysap solutions
Business View and Mysap.com
What is SAP R/3 introduction to mysap.com
FICO sap abap reporting

LOCKS IN ABAP

The description of an SAP lock to a table is made via the lock condition and the lock mode.The lock condition is a logical condition for the lines of the table to be locked. It describes the area of the table which the lock is to protect from competitive access. To avoid the administration of the lock becoming complicated, the lock condition can not be formulated as freely as the WHERE clauses: only fully qualified key fields related by AND may appear in the condition.Via the lock mode you define which operations on the table are to be protected by the lock. The lock modes available are:

Read lock (shared lock) protects read access to an object. The read lock allows other transactions read access but not write access to the locked area of the table.

Write lock (exclusive lock)  protects write access to an object. The write lock allows other transactions neither read nor write access to the locked area of the table.

Enhanced write lock (exclusive lock without cumulation) works like a write lock except that the enhanced write lock also protects from further accesses from the same transaction.

In order to be able to define SAP locks for a table, you must first create a lock object for the table via Development->Dictionary. If the data for an application object is distributed among several database tables, it is often necessary to be able to lock these tables simultaneously. It is therefore possible to include several tables in a lock object, althought they must be related via appropriate foreign key relationships. The tables involved in a lock object are also known as its base tables.

Requesting an SAP lock

When a lock object obj is activated, two function modules (see CALL FUNCTION) with the names ENQUEUE_obj and DEQUEUE_obj are generated. These lock modules are used to explicitly request or release SAP locks in an ABAP program. The SAP lock concept thus assumes a cooperative behavior by all the programs involved. This means that access from programs that do not call the specified modules are not protected.The lock conditions and lock modes for the requested locks are defined by the IMPORT parameters of the lock modules.

The lock conditions are defined by the lock parameters of the lock object. If the lock object has only one base table, each primary key field of the table corresponds to exactly one lock parameter. Apart from this, a lock parameter corresponds to a group of primary key fields that are identified by the join conditions. For each lock parameter par, the lock modules have two IMPORT parameters with the names par and X_par.The lock condition is defined by these parameters. If a parameter par is not defined or if it is defined with the initial value, this means that the corresponding key fields should be locked generically. If you really want to lock the key field with the initial value, you must also define
the parameter X_par with the value 'X'.

To define the lock modes, the lock modules have an IMPORT parameter MODE_tab for each base table tab, with which the lock mode for this table can be defined. A default value must already be set for this parameter in the definition of the lock object.You cannot set an SAP lock by finding all the lines of the table which satisfy the lock condition and marking them as locked. Rather, the lock condition and lock mode for a table are entered in a special lock table.

Collision of SAP locks

Before a requested SAP lock is entered in the lock table, a check is made on whether it collides with a lock already entered in the lock table. Two locks on the same table collide if their lock conditions overlap and their lock modes are incompatible.

The overlapping of two lock conditions on one table is a purely logical attribute. It occurs if a row of the table which meets both conditions could exist. It is therefore irrelevant for the overlap whether or not such a row really exists in the table.

The following rules apply for the compatability of locks: An enhanced write lock is incompatible with all other locks, a write lock is incompatible with all locks requested by other transactions, and a read lock is compatible with all other read locks.If locks are requested with the help of a lock object that has several base tables, all locks requested are regarded as colliding as soon as a collision is recognized for just one of the base tables involved.

Behaviour in a collision

An SAP lock that collides with an existing lock cannot be granted and is therefore not entered in the lock table.With the help of the IMPORT parameter _WAIT, you can determine how the ENQUEUE module should behave if the lock it requests collides with an existing lock. If this parameter has the value ' ', the exception FOREIGN_LOCK is triggered. The system field SY-MSGV1 is supplied with the user set by the the colliding lock. If the parameter has the value 'X', the lock request is repeated at set intervals until either the lock can be granted or an internal system time limit is exceeded. In the second case the exception FOREIGN_LOCK is also triggered.

Duration of an SAP lock

At the end of a transaction, this automatically releases all the SAP locks it holds. Note, however, that if an update routine is called by the transaction, locks can be transferred from the ordering transaction
to the update routine. In the same way, these locks are automatically released at the end of the update routine. Via the IMPORT parameter _SCOPE of the ENQUEUE module, you can determine whether a lock should be transferred to the update routine if one is called.

If _SCOPE has the value '1', the lock remains with the the ordering transaction. If _SCOPE has the value '2', the lock can pass to the update routine. Finally, if the parameter has the value '3', two locks of the same kind will be generated, one of which passes to an update routine when one is called.

By calling the DEQUEUE module, a transaction can explicitly release a lock which it holds. The lock parameter and lock mode must be supplied with the same value as for calling the ENQUEUE module. If the parameter _SCOPE has the value '1', only one lock is released which cannot pass to an update routine. If the parameter has the value '2', only one lock is released which can pass to the update program. Finally, if the parameter has the value '3', both locks can be released. Note however that a transaction can release neither a lock which has already been transferred to the update program, nor a lock which is held by another transaction.

Via the IMPORT parameter _SYNCHRON you can control whether the release of the lock should be synchronous or asynchronous. If this parameter has the value 'X', the module waits until the lock has really been removed from the lock table. If the parameter has the value ' ', a requst for deletion of the lock from the lock table is sent to the application server which manages the lock table, and then the execution of the program is immediately continued.

Monitoring of SAP locks

The transaction Display and delete locks monitors the SAP locks.

LOCK PARAMETERS

Definition of the lock parameters of a lock object:

The lock parameters of a lock object are used when the relevant lock modules are called to allocate the values to the lock arguments of the lock object.For each parameter field of the lock object (at most) one lock parameter can be defined.The name of the lock parameter generally corresponds to the name of the relevant parameter field. The name can however be freely chosen as long as it adheres to the name conventions for lock parameters.

For each parameter of the lock objects the relevant lock modules receive IMPORT parameters and X_. The parameter  possesses the relevant parameter field as reference field. If the IMPORT parameter is filled with a value in a call, all the lock fields equivalent to the parameter field in the corresponding lock arguments are filled with that value. If the parameter remains initial, generic locking takes place on these lock fields. If however the flag X_ is set, initial also means that the corresponding lock field should be locked at initial value.

NAMING CONVENTIONS OF LOCK OBJECTS
When naming the lock parameters of a lock object, the following conventions apply:

1. No lock parameter may appear twice in a lock object.
2. Each lock parameter name must adhere to the name conventions for table fields.
3. No lock parameter name may begin with the prefix 'X_'.
4. No lock parameter name may begin with the prefix 'MODE_'.
5. No lock parameter name may correspond to the name of a Basis table.
6. The names 'DDENQ_LIKE' and 'DD26E' are not allowed for lock parameters.

LOCK FIELDS
Definition of the lock fields of a lock object: 

The lock fields of a lock object are the key fields of the base tables of the lock object for which a lock mode is defined. The only exception to this rule is when the lock object only has one base table and this base table is a structure without key fields. In this case the lock fields of lock object are precisely those parameter fields of the lock object for which a lock parameter is defined. (Here too a lock mode must be defined for this base table.) The lock argument for a table is now constructed from the lock fields within this table. By virtue of the join conditions which were used to construct the lock object, each lock field is equivalent to one parameter field. If a lock parameter is defined for this parameter field, the content of the lock field in  the lock argument is controlled via this lock parameter. Otherwise only generic locking is possible for this lock field.

LOCK MODES

Definition of the lock modes of a lock object:

In the definition of a lock object one of the three lock modes 'S'(shared lock), 'E'(exclusive lock) or 'X'(exclusive lock without accumulation) can be specified for each Basis table.

For each Basis table , for which a lock mode was specified, the lock modules belonging to the lock object receive an IMPORT parameter MODE_. This has the specified value as default. In a call this can be changed to one of the other two values. This value is then entered in the lock granule for the table. Basis tables for which no lock mode is defined cannot be locked with the lock object.

LOCK GRANULE
Definition of the lock granule of a lock object:

For each base table of a lock object for which a lock mode is defined, a lock granule is formed which consists of the name of the table, the current lock mode and the lock argument for this base table. These lock granules are the information which is transmitted to the lock server when a lock module for a lock object is called.

DATABASE LOCKING
Any database permitting simultaneous access by several users requires a locking mechanism to manage and synchronize access. The tasks of this mechanism are to:

- protect data objects which a transaction is currently changing or reading from being changed by other transactions at the same time.

- protect a transaction against reading data objects which have not yet been fully written back by another transaction.

How is locking achieved?

Database systems do not usually provide commands for explicitly setting or releasing locks. Therefore, prior to executing the database operation, database locks are set implicitly when one of the Open SQL statements SELECT SINGLE FOR UPDATE, INSERT, UPDATE, MODIFY, DELETE is
called (or when the corresponding Native SQL statement is called).

What is locked?

Database systems set physical locks on all lines affected by a database call. In the case of SELECT, these are the selected entries. In the case of UPDATE, DELETE, INSERT and MODIFY, they are the entries to be changed, deleted, etc.

It is not always the table line which is locked. Tables, data pages and index pages can also be locked. The units to be locked depend on the database system you are using and the access being performed.

Lock mode

In principle, one type of lock is enough to control conflicting data accesses. However, to achieve a greater degree of parallel running among transactions, database systems use several types of locks. These can vary from system to system, but the following two are sufficient to gain an understanding of how locking works:

o Read lock (shared lock)

Read locks permit the setting of further read locks, but prevent other transactions from setting write locks for the objects in question.

o Write lock (exclusive lock)
 

Write locks do not allow other transactions to set any locks for the objects in question.

How are locks set?

You set write locks with the Open SQL statements SELECT SINGLE FOR UPDATE, INSERT, UPDATE, MODIFY and DELETE (or with the appropriate Native SQL statements).

The decision as to whether the Open SQL command SELECT or the appropriate Native SQL command sets the lock or not depends on the isolation level of the transaction. Two possible levels are distinguished:

o Uncommitted read (or dirty read)

A program using an "uncommitted read" to read data does not set locks on data objects and does not obey them. For this reason, programmers must bear in mind that their programs might read data which has not yet been finally written to the database with a database commit and could thus still be deleted from the database by a database rollback. "Uncommitted read" is the default setting in the R/3 system for the isolation level.

o Committed read

A program using a "committed read" to read data obeys the locks on data objects. This means that programmers can be sure that their programs will read only data which has been finally written to the
database with a database commit. You can set the isolation level in the R/3 system to "committed read" by calling the function module DB_SET_ISOLATION_LEVEL. The next database commit or rollback will reset the isolation level to its default setting, as will calling the function module DB_RESET_ISOLATION_TO_DEFAULT.

Many database systems employ additional isolation levels (e.g. "cursor stability" and "repeatable read"). These work like "committed read", but the read lock is retained until the next data object is read or until the database cursor is closed. Since these isolation levels are not sufficiently standardized, they are not currently used in the R/3 System.

If a transaction cannot lock an object because it is already locked by another transaction, it waits until the other transaction has released the lock. This can result in a deadlock. A deadlock occurs, for example, when two transactions are waiting for a lock held by the other.

How long is a lock retained?

In database locking, all locks are released no later than the next database commit or rollback (see Logical Unit of Work (LUW)). Read locks are usually retained for a shorter period. Sometimes, this causes problems for transactions which cover several dialog steps:

In the above example, further dialog steps follow the selection of a flight with free seats to enter additional data for the reservation. Here, the adding of the flight reservation occurs in a different LUW than the original selection of the flight. Database locking does not prevent another transaction from booking this flight in the meantime. This means that the scheduled booking may have to be canceled after all. From the user's point of view, this solution is very inconvenient. To avoid this scenario, a flight reservation system must use the SAP locking mechanism (see SAP Locking) to lock the flight for the entire duration of the transaction.

MESSAGES

MESSAGE Syntax Diagram

Variants:
1. MESSAGE xnnn.
2. MESSAGE ID id TYPE mtype NUMBER n.
3. MESSAGE xnnn(mid).

Effect Sends a message. Messages are stored in table T100, and can be maintained using Transaction SE91. They are fully integrated in the forward navigation of the ABAP Workbench. The ABAP runtime environment handles messages according to the message type specified in the MESSAGE statement and the context in which the message is sent. There are six kinds of message type:

A (Abend) Termination
E (Error) Error
I (Info) Information
S (Status) Status message
W (Warning) Warning
X (Exit) Termination with short dump
Messages are used primarily to handle user input on screens.


There is an Example program for messages that displays how messages behave in various contexts.

Variant 1 MESSAGE xnnn.

Additions:
1. ... WITH f1 ... f4
2. ... RAISING exception
3. ... INTO f

Effect Sends the message nnn from message class i with type x. You can specify the message class i in the MESSAGE-ID addition to the REPORT, PROGRAM or other introductory statement.

Example
MESSAGE I001.

- If you want to use a different message class, you can specify one in parentheses after the message number:
MESSAGE I001(SU).
- When the statement is executed, the following system variables are set:
* SY-MSGID (Message class)
* SY-MSGTY (Message type)
* SY-MSGNO (Message number)

Note Runtime errors:

- MESSAGE_TYPE_UNKNOWN: Message type unknown
- MESSAGE_TYPE_X: Deliberate program termination with short
dump

TRANSATIONS

1.SCREEN NUMBERS

The screen number identifies a screen within a program (module pool,report). Screen numbers can be up to 4 characters long, all of which must be digits. Screen numbers from 9000 are reserved for customer-specific screens. The use of screen numbers is namespace-dependent. For screens in programs in the SAP namespace, numbers less than 9000 are reserved for SAP screens, numbers between 9000 and 9500 are reserved for SAP partners, and numbers greater than 9500 are for customers.

RELATED POST

ABAP PROJECT OBJECTS
ABAP REUSE COMPONENTS

MATCH CODE OBJECTS IN ABAP


The dialog type defines the dialog steps executed for an input help.

There are the following dialog types:

Immediate value display: The hit list is displayed immediately after the input help has been called. This option is advisable if the hit list usually contains only a few entries.Complex dialog with value restriction: The dialog box for restricting values is displayed immediately. Select this option if the list of possible entries is normally very large. Restricting the set of data to be processed increases the clarity of the hit list and reduces the system load during value selection.Dialog depends on value set: If the hit list contains less than 100 entries, it is displayed immediately. If the hit list contains more than 100 entries, the dialog box for restricting values is
displayed.

SELECTION METHOD

Selection method of an elementary search help

The possible entries for a field displayed in the hit list are determined at runtime by selection from the database. The selection method describes the database object from which the data is read. A database table or view can be defined as selection method.

To use a field of the selection method in the input help (as field in the dialog box for restricting values, as column in the hit list or as value returned to the screen), a parameter with the same name must be inserted in the search help.

HOTKEYS

Hot key for a search help

The hot key permits the user to select an elementary search help from the collective search help directly in the input field with the short notation. The restrictions can also be entered directly in the dialog box for restricting values.

Letters and digits are allowed as hot key.

With the short cut, the user can select an elementary search help of a collective search help and fill in the fields of the dialog box for restricting values directly in the input field. This can save time if the user frequently looks for values using the same search help.The short cut must be entered in the input field according to the following convention:
=HK.S1.S2.S3 etc.

where HK is the hot key of the elementary search help and S1, S2, S3, etc. are the restrictions that are entered in this order in the corresponding dialog box. Each entry is considered to be a pattern with a terminating '*'. Restrictions for fields for which no entry could be made in the dialog box are ignored.

The hot key need not be entered if only one elementary search help is assigned to the field or if the elementary search help stored as the standard search help should be used. If S1 consists of more than one character, the first separator '.' can also be omitted.

If the hot key is entered without restrictions (=HK), the dialog box for restricting values appears. If restrictions are defined, the dialog box for restricting values does not appear and the hit list is displayed directly. If exactly one hit is found, the hit list is not displayed.

The values of the hits that are found are returned directly to the screen in this case.

SEARCH HELP


There are the following types of search helps:

Elementary search helps implement a search path for determining t possible entries.Collective search helps contain several elementary search helps. collective search help therefore provides several alternative sea paths for possible entries.Append search helps can be used to enhance collective search help delivered by SAP with customer-specific search paths without requiring a modification.The three components of the input help process described by a search help are the outer interface, the online behavior and the method of d collection.

The outer interface is defined by specifying the interface parameters They define the context information to be used in the input help proc and the attributes to be sent to the screen by the input help.The search help attachment defines the field contents for parametr an import parameter and the fields of the input template in which the contents of the export parameters should be returned.

ELEMENTARY SEARCH HELP.

An elementary search help is a search help that describes an input help process in which it is not possible to select one of a number of search paths.The online behavior of an elementary search help is controlled by defining the dialog type and by speifying the fields to be displayed in the dialog box for restricting values or in the dialog box for displaying the hit list (including the order in these dialog boxes).

These fields must be defined as parameters of the search help.

For data collection, a database table or a view is normally defined and the possible values are selected here. This table/view is called the selection method of the search help. If the selection method is a table, a text table can also be used for collecting data if one exists. In the selection, those fieds of the selection method (and possibly of the text table) which have parameters with the same names in the search help are used.If the standard options for describing the online behavior or data collection for the search help are not sufficient, you can define its behavior more flexibly by using a search help exit.

SEARCH HELP ATTACHMENT

A search help attachment is an assignment of a search help to a table, structure or data element, causing the corresponding search help to be automatically used to describe the input help process at this field when an ABAP Dictionary field is used in a screen.

You can attach a search help as follows:

1. Attach a search help to a structure or table field: The attached search help is available for all screen fields that refer to the table or structure field. There must be an assignment between the interface parameters of the search help and the fields of the table or structure for this type of attachment. In the input help process, this assignment results in a value transport between the corresponding fields (if they are known at least to the module pool of the screen) and the search help parameters. As for the foreign key definition, you can assign nothing, a constant or any other field (which is then sought in the module pool) to indivdiual search help parameters.

2. Attach a search help to a table: The assigned search help is available for all screen fields for which the table is a check table. There must also be an assignment between the search help parameters and the key fields of the table for this type of assignment.

SEARCH HELP INCLUSION

The search help inclusion is the mechanism with which the alternative search paths defining the behavior can be assigned to a collective search help.In a search help inclusion, any other search help can be assigned to the including collective search help. Normally the included search help will be an elementary search help. In this case the search path implemented by this search help will become one of the alternative search paths of the including search help. If the included search help is also a collective search help itself, all the elementary search helps contained in this collective search help will become alternative search paths of the including collective search help. In such a multi-level inclusion,however, you must note the following special features.

Passing on the context information and returning the selected attributes on the screen is described by the assignment made between the parameters of the including search help and the interface parameters of the included search help.

The search help inclusion is a part of the definition of the including search help. A search help can be included in any number of search helps.

Note: An append search help is automatically included in its appending

SEARCH HELP EXIT
A search help exit is a function module for making the input help process described by the search help more flexible than possible with the standard version.This function module must have the same interface as function module F4IF_SHLP_EXIT_EXAMPLE. The search help exit may also have further optional parameters (in particular any EXPORTING parameters).The type group SHLP must also be declared in the global data of the search help exit.

A search help exit is called at certain timepoints in the input help process.The source text and long documentation of the above-specified function module (including the long documentation about the parameters) contain information about using search help exits.

Function modules are provided in the function library for operations that are frequently executed in search help exits. The names of these function modules begin with the prefix F4UT_. These function modules can either be used directly as search help exits or used within other search help exits. You can find precise instructions for use in the long documentation for the corresponding function module.

TIME POINTS

During the input help process, a number of time points are defined that each define the beginning of an important operation of the input help process.If the input help process is defined with a search help having a search help exit, this search help exit is called at each of these timepoints. If required, the search help exit can also influence the process and even determine that the process should be continued at a different time point.

The following timepoints are defined:
1. SELONE

Call before selecting an elementary search help. The possible elementary search helps are already in SHLP_TAB. This timepoint can be used in a search help exit of a collective search help to restrict the selection possibilities for the elementary search helps.

Entries that are deleted from SHLP_TAB in this step are not offered in the elementary search help selection. If there is only one entry remaining in SHLP_TAB, the dialog box for selecting elementary search helps is skipped. You may not change the next timepoint.

The timepoint is not accessed again if another elementary search help is to be selected during the dialog.

2. PRESEL1

After selecting an elementary search help. Table INTERFACE has not yet been copied to table SELOPT at this timepoint in the definition of the search help (type SHLP_DESCR_T). This means that you can still influence the attachment of the search help to the screen here. (Table INTERFACE contains the information about how the search help parameters are related to the screen fields).

3. PRESEL

Before sending the dialog box for restricting values. This timepoint is suitable for predefining the value restriction or for completely suppressing or copying the dialog.

4. SELECT

Before selecting the values. If you do not want the default selection, you should copy this timepoint with a search help exit. DISP should be set as the next timepoint.

5. DISP

Before displaying the hit list. This timepoint is suitable for restricting the values to be displayed, e.g. depending on authorizations.

6. RETURN (usually as return value for the next timepoint)

The RETURN timepoint should be returned as the next step if a single hit was selected in a search help exit.

It can make sense to change the F4 flow at this timepoint if control of the process sequence of the Transaction should depend on the selected value (typical example: setting SET/GET parameters). However, you should note that the process will then depend on whether a value was entered manually or with an input help.

7. RETTOP

You only go to this timepoint if the input help is controlled by a collective search help. It directly follows the timepoint RETURN. The search help exit of the collective search help, however, is called at timepoint RETTOP.

8. EXIT (only for return as next timepoint)

The EXIT timepoint should be returned as the next step if the user had the opportunity to terminate the dialog within the search help exit.

9. CREATE

The CREATE timepoint is only accessed if the user selects the function "Create new values". This function is only available if field CUSTTAB of the control string CALLCONTROL was given a value not equal to SPACE earlier on.

The name of the (customizing) table to be maintained is normally entered there. The next step returned after CREATE should be SELECT so that the newly entered value can be selected and then displayed.

10. APP1, APP2, APP3

If further pushbuttons are introduced in the hit list with function module F4UT_LIST_EXIT, these timepoints are introduced. They are accessed when the user presses the corresponding pushbutton.

Note: If the F4 help is controlled by a collective search help, the search help exit of the collective search help is called at timepoints SELONE and RETTOP. (RETTOP only if the user selects a value.) At all other timepoints the search help exit of the selected elementary search help is called.If the F4 help is controlled by an elementary search help, timepoint RETTOP is not executed. The search help exit of the elementary search help is called at timepoint SELONE (at the moment). This search help exit should not do anything at this timepoint. Any preparatory work should be carried out at timepoint PRESEL1.

FUNTIONALITY
This module has been created as an example for the interface and design of Search help exits in Search help.All the interface parameters defined here are mandatory for a function module to be used as a search help exit, because the calling program does not know which parameters are actually used internally.

A search help exit is called repeatedly in connection with several events during the F4 process. The relevant step of the process is passed on in the CALLCONTROL step. If the module is intended to perform only a few modifications before the step, CALLCONTROL-STEP should remain unchanged.

However, if the step is performed completely by the module, the following step must be returned in CALLCONTROL-STEP.For more detailed information please refer to the documentation describing the concept of the search help exit.

The module must react with an immediate EXIT to all steps that it does not know or does not want to handle.

TEXT TABLE

Table A is the text table of table B if the key of A comprises the key of B and an additional language key field (field with data type LANG).Table A can therefore contain explanatory text in several languages for each key entry of B.To link the key entries with the text, text table A must be linked with table B using a foreign key. KeY fields of a text table must be selected for the type of foreign key fields.Only one text table can be created for a table. When it is activated, the system checks whether another table already has a text foreign key for the specified table.If a text table exists, it is used at different places in the system to show the text for the key entries in the logon language of the user automatically.

If for example table B is the check table of a field, the existing key entries of table B are displayed as possible input values when F4 is pressed. The explanatory text is also shown in the logon language of the user for each key value.

NAME OF SEARCH HELP PARAMETER

The parameters of a search help define the context data to be used in the input help and the data that can be returned to the input template.There must be a parameter of the search help corresponding to each field in the dialog box for restricting values and to each field in the hit list.The parameters of an elementary search help correspond to fields of the selection method. They can copy the necessary fields of the selection method to this field as search help parameters with the input help.

In exceptions, parameters that do not correspond to any field of the selection method must be inserted. This can be necessary if the search help uses a search help exit that needs additional parameters.

Note: The search help may not contain any parameter for the client. The input help automatically selects the user's logon client.

VARIENTS

Variant name
Name of the variant you want to edit.

Procedure

Enter a variant name.

If you want to change an existing variant, you can display a list of all variants by selecting Environment -> Directory. From this list, you can choose a variant for editing.

Dependencies

For background requests, a report must have at least one variant.

Variant values/attributes

A variant consists of two parts:

1.) The values entered on the selection screen

2.) The attribues and display attributes of the parameters and select-options.

VIEW

Name of an SAP table view, 16 characters

A view is a logical view on one or more tables, that is, a view is not actually physically stored, instead being derived from one or more other tables.In the simplest case, this derivation process can involve simply suppressing the display of one or more fields from a table (projection) or transferring only certain records from a table to the view (selection). More complicated views can be assembled from several tables, with individual tables being linked using the relational join operation.

Use

Logical views for the application permitting direct access to the data can be generated with the definition of view. The structure of such a view is defined by specifying the tables and fields involved in the view.

LOCK OBJECTS

A lock object is a virtual link of several SAP tables which is used to synchronize simultaneous access by two users to the same set of data (SAP lock concept).Locks are requested and released in the programming of online transactions by calling certain function modules which are automatically generated from the definition of the lock objects. These lock objects must be explicitly created in the ABAP Dictionary.

To set locks, you must perform the following steps:

1. You must define a lock object in the ABAP Dictionary. The name of the lock object should begin with E.

2. The function modules for requesting and releasing locks which are created automatically when the lock object is activated must be linked to the programming of the relevant online transactions.

RELATED POST

MATCH CODE OBJECTS 2
MATCH CODE OBJECTS 1

BUFFERING IN SAP ABAP

Buffer Components:An SAP buffer consists of the following parts:

Mode table :The mode table resides in shared memory and tells you which pool contains which shared memory areas. The mode table is part of the common information on the shared memory areas that are accessed by the work processes.

For example, SAP Key 1 with Mode = 0, instructs the OS kernel to extract this buffer from the default pool and to allocate a unique shared memory segment. SAP Key 10 with Mode = pool size instructs the OS kernel to store the buffer specifically in pool 10. SAP Key 11 with Mode = -10 means that the buffer is located in pool 10.
SAP Global Management Table A shared memory area that is allocated by the dispatcher during system startup.

When semaphore protection is on, the SAP Global Management Table is addressed exclusively by SAP Shared Memory Management. This is a central agent that is found in each work process and that sets up a shared memory area for the local application server or instance. The SAP Shared Memory Management issues a call to the operating system (OS) when it creates a shared memory area.


As a result, the SAP key is assigned to an OS key. The OS returns a unique identifier (handle) for the shared memory area, with which the SAP Shared Memory Management addresses the shared memory area that was created by the OS. All work processes in the SAP System can access the SAP Global Management Table. The handle can be accessed by all work processes.


Address Table Every work process contains this table. Assigns virtual addresses to the physical addresses of the shared memory areas.


Shared Memory Objects These include the buffers, for example.
Header Contains information on the shared memory area (also called memory segment). If a write error occurs outside the segment area, then the uniformity of the header is destroyed. The control function of the SAP Management of Shared Memory checks the consistency of the headers.


ID Identifies the memory area. The ID is assigned when a SAP Shared Memory Management user requests the memory area.
Storage Class The memory class. Examples of memory classes: permanent (local), shared, roll, paging and short.
Subdivision A mark for the requested area that can be referred to later when you release the memory area.


Definition


The name table (nametab) contains the table and field definitions that are activated in the SAP System. An entry is made in the Repository buffer when a mass activator or a user (using the ABAP Dictionary, Transaction SE11) requests to activate a table. The corresponding name table is then generated from the information that is managed in the Repository.


The Repository buffer is mainly known as the nametab buffer (NTAB), but it is also known as the ABAP Dictionary buffer.


The description of a table in the Repository is distributed among several tables (for field definition, data element definition and domain definition). This information is summarized in the name table. The name table is saved in the following database tables:


• DDNTT (table definitions)
• DDNTF (field descriptions)


The Repository buffer consists of four buffers in shared memory, one for each of the following:


Table definitions TTAB buffer Table DDNTT
Field descriptions FTAB buffer Table DDNTF
Initial record layouts IREC buffer Contains the record layout initialized

depending on the field type


Short Nametab SNTAB buffer A short summary of TTAB and FTAB buffers
The Short nametab and Initial record layouts are not saved in the database. Instead, they are derived from the contents of tables DDNTT and DDNTF.


When access to a table is requested, the database access agent embedded in each work process first reads the Short nametab buffer for information about the table. If the information is insufficient (for example, the SELECT statement uses a non-primary key) it accesses the Table definitions buffer and then the Field descriptions buffer. By reading the Repository buffers, the database access agent knows whether the table is buffered or not. Using this information, it accesses the table buffers (partial buffer or generic buffer) or the database.


The IREC buffer is read:


• When a REFRESH command is executed in an ABAP program
• At an INSERT command, when a record is created in the buffers before the data is inserted and the fields are initialized with the values found in IREC buffer
You can set the buffers mentioned above by editing the parameters in the instance profile

There are two kinds of table buffers:
• Partial table buffers
• Generic table buffers


Use


The table below displays these table buffers and their functions.


Whether a table is partially buffered, generically buffered, or fully buffered depends on its attribute settings. You can change the buffer attributes of a table using Transaction SE13.

Definition

The following table displays the program buffer and its functions.
Buffer Also known as Function
Program buffer SAP executable buffer ABAP buffer PXA (Program Execution Area) Stores the compiled executable versions of ABAP programs (loads). The contents of this buffer are stored in tables D010L (ABAP loads), D010T (texts) and D010Y (symbol table).

The program buffer has a hash structure and supports LRU (Least Recently Used) displacement.
You can reconfigure the program buffer by adjusting its instance profile parameters.


Definition

There are two kinds of SAPgui buffers:

• Presentation buffers
• Menu buffers

The following table shows the SAPgui buffers and their functions:

Roll and Paging Buffers, Extended Memory

Definition

The roll and paging buffers are the preferred working area of the roll and paging areas for an instance (application server). The remaining area is located on disk as roll and paging files. The user context is stored in the extended memory and the roll area (when the job is "rolled out" of a work process). The paging area stores special data for the ABAP processor, while the extended memory stores a large portion of the internal tables of a program.

You set the roll and paging buffers, as well as the extended memory using the parameters in the instance profile

SAP Calendar Buffer

Definition

The SAP calendar buffer stores all defined factory and public holiday calendars.
Calendars are stored in the database tables TFACS and THOCS.
The buffer has a directory structure. This means that if the shared memory is configured too small, only the required data is loaded; there is no LRU displacement of the contents of the buffer.

You can change the calendar buffer by editing the parameter in the instance profile

SAP Cursor Cache

Definition

The SAP cursor cache helps to improve system performance by reducing the number of parsing of SQL statements; it is database-dependent. The SAP cursor cache is only slightly different for Oracle, Informix and SAP DB. It is totally different for AS/400 and MS SQL Server.
There are two types of cursor caches:
• Statement ID cache
• Statement cache

Changing the SAP cursor cache parameter value in the default profile will affect other areas as well. You are therefore advised not to tune it without the recommendation of a qualified SAP expert.

Statement IDs and the Statement Analyzer
The source of each SQL statement in the SAP System (ABAP, DYNP, the C modules of the database interface) assigns an ID to its Open SQL / Native SQL etc. statement. The statement ID includes:

• Module name (report name)
• Statement number (line number)
• Timestamp (time of ABAP generation)

The statement ID provides an easy way to recognize statements. There may be different statement IDs for one statement (for example, different ABAP programs doing the same SELECT ). The Statement Analyzer eliminates such duplicities. When it receives an SQL statement (in control block form), this database interface module checks if the statement is simple (for example, SELECT * FROM T100 WHERE... =... AND... =... ), or complex (for example, SELECT * FROM T100 WHERE... <... AND... >... ). If the statement ID is simple, the Statement Analyzer assigns a ‘normalized’ statement ID.
The analyzer is called by the RSQL or Open SQL interface. If it is able to assign a normalized ID, the original ID (if existing) is replaced.


RELATED POST

SAP LOCK CONCEPT
SAP LANDSCPAE

CONTROL BLOCKS IN ABAP

Processing Control Levels

When you sort an extract data set, control levels are defined in it. The control level hierarchy of an extract data set corresponds to the sequence of the fields in the HEADER field group. After sorting, you can use the AT statement within a loop to program statement blocks that the system processes only at a control break, that is, when the control level changes.

AT NEW | AT END OF .
...
ENDAT.

A control break occurs when the value of the field or a superior field in the current record has a different value from the previous record (AT NEW) or the subsequent record (AT END). Field must be part of the HEADER field group.If the extract dataset is not sorted, the AT... ENDAT block is never executed. Furthermore, all extract records with the value HEX 00 in the field are ignored when the control breaks are determined.


The AT... ENDAT blocks in a loop are processed in the order in which they occur. This sequence should be the same as the sort sequence. This sequence must not necessarily be the sequence of the fields in the HEADER field group, but can also be the one determined in the SORT statement.


If you have sorted an extract dataset by the fields , , ..., the processing of the control levels should be written between the other control statements as follows:

LOOP.
AT FIRST.... ENDAT.
AT NEW ....... ENDAT.
...
AT ..... ENDAT.

...
AT END OF .... ENDAT.
AT LAST..... ENDAT.
ENDLOOP.


You do not have to use all of the statement blocks listed here, but only the ones you require.

REPORT DEMO.
DATA: T1(4), T2 TYPE I.
FIELD-GROUPS: HEADER.
INSERT T2 T1 INTO HEADER.


T1 ='AABB'. T2 = 1. EXTRACT HEADER.
T1 ='BBCC'. T2 = 2. EXTRACT HEADER.
T1 ='AAAA'. T2 = 2. EXTRACT HEADER.
T1 ='AABB'. T2 = 1. EXTRACT HEADER.
T1 ='BBBB'. T2 = 2. EXTRACT HEADER.
T1 ='BBCC'. T2 = 2. EXTRACT HEADER.
T1 ='AAAA'. T2 = 1. EXTRACT HEADER.
T1 ='BBBB'. T2 = 1. EXTRACT HEADER.
T1 ='AAAA'. T2 = 3. EXTRACT HEADER.
T1 ='AABB'. T2 = 1. EXTRACT HEADER.


SORT BY T1 T2.
LOOP.
AT FIRST.
WRITE 'Start of LOOP'.
ULINE.
ENDAT.
AT NEW T1.
WRITE / ' New T1:'.
ENDAT.
AT NEW T2.
WRITE / ' New T2:'.
ENDAT.
WRITE: /14 T1, T2.
AT END OF T2.
WRITE / 'End of T2'.
ENDAT.
AT END OF T1.
WRITE / 'End of T1'.
ENDAT.
AT LAST.
ULINE.
ENDAT.
ENDLOOP.


This program creates a sample extract, containing the fields of the HEADER field group only. After the sorting process, the extract dataset has several control breaks for the control levels T1 and T2, which are indicated in the following figure:

In the loop, the system displays the contents of the dataset and the control breaks it encountered as follows:


RELATED POSTS

ABAP PROGRAM INTERFACE

SYSTEM FIELDS IN SAP

ABCDE Constant: Alphabet (A,B,C,...)
APPLI SAP applications
BATCH Background active (X)


IF SY-BATCH EQ SPACE.

WRITE: / 'Report was started on-line'.
WRITE: / 'Using variant:', SY-SLSET.
ELSE.
WRITE: / 'Report was started in background'.

ENDIF.


BATZD Background SUBMIT: Daily
BATZM Background SUBMIT: Monthly
BATZO Background SUBMIT: Once
BATZS Background SUBMIT: Immediately
BATZW Background SUBMIT: Weekly
BINPT Batch input active (X)


This field indicates if the transaction was called in a Batch Input session or by an online user. To test it, a batch input session must be created. From Release 3.1g the next procedure can be used.

Create a report which displays this system field
Create a Transaction code for this report
Use transaction SHDB to record a the previous transaction
Press the Overview button and choose the 'generate program' function.
Running the previously generated program it will create a Batch Input session
Now call transaction SM35 and process the created Batch Input in foreground.

It should display an 'X' for system field SY-BINPT.

BREP4 Background SUBMIT: Root name of request report
BSPLD Background SUBMIT: List output to spool
CALLD CALL mode active (X)

This field indicates if the transaction was called from another transaction.
Create a report which displays this system field
Create a Transaction code for this report
Create a new report containing the next ABAP command: CALL TRANSACTION tcode. Where tcode is the Transaction code you created. When you run this report, it should display an 'X' for system field SY-CALLD.


CALLR Print: ID for print dialog function
CCURS Rate specification/result field (CURRENCY CONVERT)
CCURT Table rate from currency conversion
CDATE Date of rate from currency conversion
COLNO Current column during list creation

WRITE: SY-COLNO, ',', SY-LINNO, 'Cursor position (column, row).'.
CPAGE Current page number
WRITE: / 'SY-CPAGE:', SY-CPAGE LEFT-JUSTIFIED.

CPROG Runtime: Main program

WRITE: /5 'Main program:' RIGHT-JUSTIFIED, 40 SY-CPROG.

CTABL Exchange rate table from currency conversion
CTYPE Exchange rate type 'M','B','G' from CURRENCY CONVERSION
CUCOL Cursor position (column)

WRITE: / 'SY-CUCOL:', SY-CUCOL LEFT-JUSTIFIED.

CUROW Cursor position (line)

WRITE: / 'SY-CUROW:', SY-CUROW LEFT-JUSTIFIED.

DATAR Flag: Data received

In transaction programming this field indicates the change of data on the screen. In the PBO part you may set default values of the input fields of the dynpro. In the PAI part you can check if they were changed. If SY-DATAR is set, then the user has modified or entered new data on the screen.


DATLO Local date for user
DATUM System: Date
DATUT Global date related to UTC (GMT)
DAYST Summertime active ? ('daylight saving time')
DBCNT Number of elements in edited dataset with DB operations
WRITE: /12 'Number of selected records:', SY-DBCNT CENTERED.
DBNAM Logical database for ABAP/4 program
DBSYS System: Database system
DCSYS System: Dialog system
DSNAM Runtime: Name of dataset for spool output
DYNGR Screen group of current screen
DYNNR Number of current screen
FDAYW Factory calendar weekday
FDPOS Location of a string

SEARCH T FOR 're'.
READ TABLE T INDEX SY-TABIX.
WRITE: / SY-TABIX, T-FIELD.
SKIP.
WRITE: /9 'At the example of sy-tabix, Row', (3) SY-TABIX, ',' ,
'keyword ''re'' found at off-set position:', (3) SY-FDPOS.

FMKEY Current function code menu
HOST Host

INDEX Number of loop passes
DO 5 TIMES.
WRITE: SY-INDEX.
ENDDO.

LANGU SAP logon language key
LDBPG Program: ABAP/4 database program for SY-DBNAM
LILLI Number of current list line

AT LINE-SELECTION.
DETAIL.
* SY-LSIND is the index of the current list
WRITE: / 'SY-LSIND:', SY-LSIND LEFT-JUSTIFIED.
* SY-LISTI is the index of the previous list
WRITE: / 'SY-LISTI:', SY-LISTI LEFT-JUSTIFIED.
* SY-LILLI is the number of the selected line in the absolute list
WRITE: / 'SY-LILLI:', SY-LILLI LEFT-JUSTIFIED.
LINCT Number of list lines
WRITE: / SY-LINCT, 'line and', (3) SY-LINSZ, 'column is a page'.
LINNO Current line for list creation
WRITE: SY-COLNO, ',', SY-LINNO, 'Cursor position (column, row).'.
LINSZ Line size of list
WRITE: SY-COLNO, ',', SY-LINNO, 'Cursor position (column, row).'.
LISEL Interact.: Selected line
* contents of the selected line
WRITE: / 'SY-LISEL:', SY-LISEL.
LISTI Number of current list line
* SY-LISTI is the index of the previous list
WRITE: / 'SY-LISTI:', SY-LISTI LEFT-JUSTIFIED.


LOCDB Local database exists
LOCOP Local database operation
LOOPC Number of LOOP lines at screen step loop
LSIND Number of secondary list
* SY-LSIND is the index of the current list

WRITE: / 'SY-LSIND:', SY-LSIND LEFT-JUSTIFIED.

LSTAT Interact.: Status information for each list level
MACDB Program: Name of file for matchcode access
MACOL Number of columns from SET MARGIN
MANDT Client number from SAP logon
MARKY Current line character for MARK
MAROW No. of lines from SET MARGIN statement
MODNO Number of alternative modi
MSGID Message ID
MSGLI Interact.: Message line (line 23)
MSGNO Message number
MSGTY Message type (E,I.W,...)
MSGV1 Message variable
MSGV2 Message variable
MSGV3 Message variable
MSGV4 Message variable
OPSYS System: Operating system
PAART Print: Format
PAGCT Page size of list from REPORT statement
PAGNO Runtime: Current page in list
PDEST Print: Output device
PEXPI Print: Spool retention period
PFKEY Runtime: Current F key status
PLIST Print: Name of spool request (list name)
PRABT Print: Department on cover sheet
PRBIG Print: Selection cover sheet
PRCOP Print: Number of copies
PRDSN Print: Name of spool dataset
PREFX ABAP/4 prefix for background jobs
PRIMM Print: Print immediately
PRNEW Print: New spool request (list)
PRREC Print: Recipient
PRREL Print: Delete after printing
PRTXT Print: Text for cover sheet
REPID Program: Name of ABAP/4 program
RTITL Print: Report title of program to be printed
SAPRL System: SAP Release
SCOLS Columns on screen
SLSET Name of selection set
SPONO Runtime: Spool number for list output
SPONR Runtime: Spool number from TRANSFER statement
SROWS Lines on screen
STACO Interact.: List displayed from column
STARO Interact.: Page displayed from line
STEPL Number of LOOP line at screen step
SUBRC Return value after specific ABAP/4 statements
SUBTY ABAP/4: Call type for SUBMIT
SYSID System: SAP System ID
TABIX Runtime: Current line of an internal table


SEARCH T FOR 're'.
READ TABLE T INDEX SY-TABIX.

TCODE Session: Current transaction code
TFDSN Runtime: Dataset for data extracts
TFILL Current number of entries in internal table
TIMLO Local time for user
TIMUT Global time related to UTC (GMT)
TITLE Title of ABAP/4 program
TLENG Line width of an internal table
TMAXL Maximum number of entries in internal table (?)
TNAME Name of internal table after an access (?)
TOCCU OCCURS parameter with internal tables
TPAGI Flag indicating roll-out of internal table to paging area (?)
TSTLO Timestamp (date and time) for user
TSTUT Timestamp (date and time) related to UTC (GMT)
TTABC Number of line last read in an internal table (?)
TTABI Offset of internal table in roll area (?)
TVAR0 Runtime: Text variable for ABAP/4 text elements
TVAR1 Runtime: Text variable for ABAP/4 text elements
TVAR2 Runtime: Text variable for ABAP/4 text elements
TVAR3 Runtime: Text variable for ABAP/4 text elements
TVAR4 Runtime: Text variable for ABAP/4 text elements
TVAR5 Runtime: Text variable for ABAP/4 text elements
TVAR6 Runtime: Text variable for ABAP/4 text elements
TVAR7 Runtime: Text variable for ABAP/4 text elements
TVAR8 Runtime: Text variable for ABAP/4 text elements
TVAR9 Runtime: Text variable for ABAP/4 text elements

TZONE Time difference from 'Greenwich Mean Time' (UTC) in seconds
UCOMM Interact.: Command field function entry
ULINE Constant: Underline (---------...)
UNAME Session: SAP user from SAP logon
UZEIT System: Time
VLINE Constant: Vertical bar
WAERS T001: Company code currency after reading B segment
WILLI Number of current window line
WINCO Cursor position in window (column)
WINDI Index of current window line
WINRO Cursor position in window (line)
WINSL Interact.: Selected window line
WINX1 Window coordinate (column left)
WINX2 Window coordinate (column right)
WINY1 Window coordinate (line left)
WINY2 Window coordinate (line right)
WTITL Standard page header indicator
XCODE Extended command field
ZONLO Time zone of user

RELATED POST

SAP LOCK CONCEPT
SAP LANDSCPAE

AccountsDay to Day PlanningCheck Deposit Customization