Showing posts with label INTERACTIVE REPORTS. Show all posts

SAP ABAP Programming report in sap mm module

This abap programming report for sap in materiel management module ,you can customize this report to analyze purchase orders according to:

1. Account assignment (Lists purchase orders for a given account assignment, for example, by cost center).

2. PO number (Lists all purchase orders within a range of numbers)

3. Archived purchasing documents (Lists POs that have been removed from the system and archived)

4. Requirement tracking number (Lists all purchasing documents created with reference to a series of purchase requisitions having a certain requirement tracking number. The analysis shows the requisitions for which purchase orders have already been created.)

5. Vendor/material (Lists purchase orders created for a particular vendor, material, or material group)

If you are in the program Purchase orders by material, you must enter the Material. If you are in the program Purchase orders by account assignment, you must enter the Account assignment.

The selection options are based on the relevant purchasing document and the list can vary to some extent among documents. The more information the list contains, the more time it will take for the report to run. Larger reports should be reserved for background processing to save time.

You can combine search criteria to find a specific purchase order (for example, you could search for a PO that was issued to a specific vendor for a specific cost center in July).

The selection screen of this report includes:

Variants
Dynamic selection options
User variables
Execution (and print) in background

The output of this report includes :

Listing purchase order, sorted by item number
Selection of purchase orders for individual display (double-click on the individual purchase order)

Selection of purchase order items for individual display (double-click on one of the purchase order line items, or click on it and choose History → Changes → Delivery schedule)

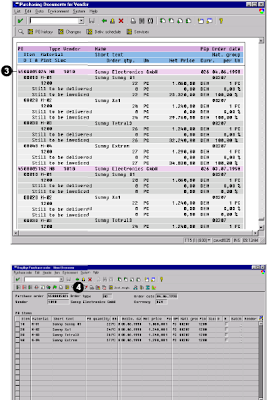
To access the first screen for this report, choose Logistics → Materials management → Purchasing → Purchase order → List displays → By vendor.

1. Enter 1010 in Vendor. This will produce a report of all purchase orders for this vendor.
2. Choose Execute.

This report shows all the purchase orders for vendor 1010.

From this screen, you can drill down to get more information.

3. Double-click on the PO header to access the purchase order (for example, 450005024). This screen shows the selected purchase order.
4. Choose Back to return to the original report.
Related Posts:

SAP ABAP HR report for EEOC
ABAP Programming hr new hire report
SAP ABAP HR PAYROLL REPORT
ABAP HR head count report for sap


sales in erp programming invoice report
sap mm materiel overview report

SAP ABAP FICO Profitability Analysis Report for Sales Plan

SAP ABAP FICO report about profitability analysis provides a contribution margin for distribution channels, divisions, and products. Only planned data is displayed for the contribution margin. This plan can be used to provide fore casted data to marketing as well as to sales and operations planning .A product line manager would use this report to project the anticipated performance of specific divisions and products and possibly to submit this budget to a vice-president. Actual data can be compared against plan data, and a plan can be developed using manual estimates, or formulas in which previous historical performance is taken into consideration.

You must set the Controlling Area before running the report. Choose Accounting → Controlling → Cost centers → Profitability analysis → Environment → Set operating concern. For the examples in this section, the operating concern is set to IDEA using cost-based profitability analysis.

All reports in profitability analysis are user-defined. This means you must configure and generate the operating concern before creating any reports and determine the rows, columns, variables, and general format by using drilldown reporting (forms and reports).

You do not need to enter selection options for this report. All options are already hard-coded in the report. This means that only 1998 data is available. If you need to run a report for a different year, you must create a new report or define the period and fiscal year characteristics as variables within the report configuration.

The profitability analysis line items which list are context-sensitive. For example, when you position the cursor on a cell for a line item, only the reports that contain that line item show data. This improves performance of the report as a whole.

Once the original profitability analysis document appears, the original documents related to the line item can be retrieved. For example, from a sales document, a material master, customer master, billing document, and accounting document is available. From a direct financial entry, however, only the cost element and accounting documents are available. From settlement documents, the controlling object from which the settlement took place is generally available.

Two different views are available in this report:

1. Selected columns run across the report, while the characteristics (products, for example) run down the side.

2. All columns for a single selected product show as rows for a contribution analysis.

You can analyze data using ranking lists, exception reporting, and sorting; list line items in the profitability analysis database; and access additional SAP data from this report.

This report contains data obtained from postings to cost-based CO-PA. As such, the data cannot be changed or manipulated from the report. Since cost-based—not account-based—CO-PA is used, value fields are used in the analysis instead of account numbers or cost elements.

Sample code and screens :

A product manager wants to analyze the projected contribution margin of a particular product based on the anticipated distribution channel through which the products will be sold.

To access the first screen for this report, choose Information systems → Accounting → Profitability analysis Profitability report → Report selection.

From the reporting tree, choose the following report:

Absatzplan → Sales Plan/1998.

The default sales organization number (for example, 1000) cannot be changed.

Divisions show in rows. In this example, all postings were assigned to a division. If postings were not assigned to a division, Not assigned would appear in the last row.

Planned data for fiscal year 1998 shows in columns.

1. Choose Next columns.


This screen shows additional planned data for fiscal year 1998.

2. Choose Next columns.

This screen shows additional planned data for fiscal year 1998.

3. Click once on the header field, Division.

4. Click once on the Distr. Channel characteristic in the Navigation section.

The distribution channels list in rows.

The division is an available characteristic, but it has not been selected. Therefore, all distribution
channels list.

5. Click the diamond next to the first listed distribution channel, 10.

The diamond and navigation bars change color to indicate hotspot activation.

6. Choose Display .

Columns show as rows for the selected distribution channel.

7. Choose Scroll Down .


Related Posts:


What is SAP R/3 introduction to mysap.com
FICO sap abap reporting
abap fico profitability analysis and customer analysis

Interactive List Techniques Lesson Thirtyt Seven


When a user chooses a function from a list, it triggers that function's function code. This function code, in turn, triggers a corresponding event.Some function codes are reserved for use by the system and therefore do not trigger an interactive event when the user chooses them (that is, the system does not return to the program). Instead these codes trigger a corresponding system function.All function codes with the exception of "PICK" as well as all codes reserved for system use trigger the event AT USER-COMMAND. For more information, refer to the Program Interface unit.The statement MODIFY LINE modifies the first line of the list. The values stored in the hide area for this line are placed in the corresponding fields, and are thus available in the program.

The statement MODIFY CURRENT LINE changes the last line to have been chosen by line selection or the READ LINE statement (even if it was in a different list level).

If you use the LINE FORMAT addition, the selected line is formatted according to the specifications , , ...

The addition FIELD VALUE replaces the field contents of , , ... in the list line with the current values of , , ... (all values are converted to type C).The contents of , , ... themselves are not replaced.

If a field from the line being modified is displayed more than once, that line will only be modified the first time it is displayed.

The LINE VALUE FROM addition allows you to replace the entire line being modified with the current contents of field .

The FIELD statement, allows you to find out the name of the field in which the cursor is positioned. The name of the variable from which the value comes is placed in the field . However, for the sort criterion, you only use the name of the field as it appears in the table definition. You therefore need to use an offset specification to find out the field name. The offset is the length of the structure name plus one character for the hyphen.

The name of the output field is provided in the field specified in the FIELD parameter. The output value is contained in the field specified in the VALUE parameter.

The operation sets the return code sy-subrc.

sy- subrc = 0: The cursor was positioned on a field.
sy- subrc = 4: The cursor was not positioned on a field.

Caution: Do not use the value from the VALUE parameter as a selection criterion in a SELECT statement. If it is not a character field, the system will convert its type, which could lead to undesired results. It is better to use the hide technique instead.

Before you find out the sort field, check that the user placed the cursor on a valid line. If this is not the case, you should display an appropriate message.Decreasing the list level (changing the value of sy-lsind) should always be the last action before you display the list buffer. This system field determines the list level at which the new list is displayed. The hide area and list buffer of any higher list levels are automatically initialized.

You can use system field sy-lsind to determine the list level at which the list is displayed. In the example above, list level 2 where the list is sorted according to the number of unoccupied seats is being displayed. The statement sy-lsind = 1 causes the list to be displayed at list level 1, thus replacing the list sorted according to date, which would normally be displayed first.You cannot assign a value to sy-lsind that is greater than the current value of the field assigned by the system. This means you cannot bypass list levels in ascending direction.

You should only change sy-lsind in the last statement before the list is displayed, since changing the value does not always lead to an immediate change of list level. The new list level is assigned to the list at the very end, after the entire list buffer has been displayed. If you are not acquainted with this behavior, you could program your lists incorrectly.

Message types have the following effects on list processing:

Type E messages discard the current detail lists and return to the list level previously displayed.

Type W messages are always displayed as error messages (type E).

While the basic list is being created, type W and type E messages always lead to program termination (corresponds to type A).

LESSON 38 INTRODUCTION TO SCREEN PROGRAMMING

SAP Solution Manager Overview
People Centric SAP CRM IntroductionCRM Technical Infrastructure

Basics of Interactive Reporting in ABAP Lesson Thirty Five


When the user starts an executable (type 1) program, the program context and memory space for data objects (variables and structures) are made available on the application server. The subsequent program flow is controlled by the ABAP run time system.If the program contains a selection screen, the ABAP run time system sends it to the presentation server at the start of the program.

Once the user has finished entering data on the selection screen, he or she chooses 'Execute' to tell the system to start processing the rest of the program. The data entered on the selection screen is automatically placed in the corresponding data objects. The ABAP run Time system takes over control of the program.In this simple example, there is only one ABAP processing block to be processed by the runtime system.This processing block contains a read access to the database. The program sends information to the database about the records that should be read.

The database returns the required database records and the run time system ensures that the data is placed in the relevant data objects.The list output is also programmed in the processing block. After the processing block finishes, the run time system sends the list as a screen to the presentation server.Selection screens allow users to enter ranges of values. They are normally used to define the set of data that needs to be read from the database.

As well as the normal graphical elements (group boxes, check boxes, radio buttons, and so on) that you use in screens, selection screens also have input/output fields (PARAMETERS) and special groups of input/output fields (SELECT-OPTIONS).

You place a single input/output field on the selection screen using the PARAMETERS statement.

You can use the SELECT-OPTIONS statement to place a group of fields on the screen that allows users to enter complex selections. The selection may be a single value, or any form of interval (discrete or continuous). You can also use patterns. (See following slides).

You can create variants for selection screens.If you declare an input field with reference to an ABAP Dictionary field, any search helps defined for the Dictionary field will be available on the selection screen.Selection texts can be translated into other languages. They are then displayed in the user's logon language.

Selection ranges are stored in programs using an internal table.The ABAP statement SELECT-OPTIONS FOR declares an internal table called , containing four fields - SIGN, OPTION, LOW, and HIGH. The fields LOW and HIGH have the same type as the field .

The SIGN field can take the value 'I' (for inclusive) or 'E' (for exclusive).

The OPTION field can contain relational operators, pattern operators, and operators that allow you to enter intervals.


To define a selection screen, include the required PARAMETERS and SELECT-OPTIONS statements in your data declarations. If you define more selection screens than just the standard selection screen, you must enclose the additional definitions in the statements SELECTIONSCREEN BEGIN OF SCREEN and SELECTION-SCREEN END OF SCREEN where is the number of the selection screen.

For information about other graphical elements that you can place on a sele ction screen, such as group boxes, checkboxes, radio buttons, references to input fields on other selection screens and so on, see the keyword documentation for the SELECTION-SCREEN statement

The standard selection screen is displayed by the ABAP run time system when the program starts.User-defined selection screens are displayed when you use the statement CALL SELECTIONSCREEN . This statement sets the return code sy-subrc to zero if the user chooses 'Execute', and to 4 if the user chooses 'Cancel'.

You can also call a selection screen as a modal dialog box. To do this, use the syntax CALL SELECTION-SCREEN STARTING AT ENDING AT where and are the coordinates of the top left-hand corner of the screen. and are the coordinates of the bottom right-hand corner.

Selection screen processing is event-driven. Events are ABAP processing blocks that are called by the runtime system in a particular order and processed sequentially. In the program, each event is introduced by an event keyword. The processing block ends when the next event block starts, or the definition of a subroutine or dialog module occurs.

AT SELECTION-SCREEN OUTPUT is processed before the selection screen is displayed. You can use this event to modify the selection screen dynamically.

AT SELECTION-SCREEN ON HELP-REQUEST FOR and
AT SELECTION-SCREEN ON VALUE-REQUEST FOR allow you to define your own F1 and F4 help.

AT SELECTION-SCREEN is processed when the user presses ENTER or chooses another function on the selection screen. You can use this event to check the values the user entered on the screen. The addition ON... allows you to control which fields or groups of fields should accept input again in the event of an error.An ABAP program consists of a sequence of processing blocks (events) that are processed by the run time system in a particular order.

LOAD-OF-PROGRAM is triggered directly after the system has loaded a program with type 1, M, F, or S into an internal session. The processing block is executed once only for each program in each internal session.

INITIALIZATION is processed in executable (type 1) programs, directly before the selection screen is displayed. You can use the corresponding processing block to preassign values to the parameters and selection options on the selection screen.

START-OF-SELECTION is processed after the selection screen has been processed. If you are working with a logical database, the corresponding GET events are triggered after START-OFSELECTION.

END-OF-SELECTION is processed after all of the data has been read, and before the list is displayed.

TOP-OF-PAGE is an event in list-processing. The processing block is always executed when you start a new page in the list.

Once the basic list has been displayed, you can react to possible user actions. Detail lists allow you to distribute the information you want to display across several lists.This makes the lists easier for the user to understand, and improves performance, since you can delay reading extra information from the database until the user actually requests it.You can also use additional selection screens to allow the user to enter further restrictions.

For each basic list you can use up to 20 detail lists. Each list is stored in its own list buffer. When the user chooses 'Back' (green arrow) or 'Cancel' (red cross), he or she returns to the previous list.This action initializes the list buffer of the list level the user just left.When the user chooses 'Exit' (yellow arrow), the system terminates the list processing and returns to the standard selection screen.

The events START-OF-SELECTION, GET, END-OF-SELECTION, TOP-OF-PAGE and END-OFPAGE can be used only to create basic lists.

To create detail lists, use the events AT LINE-SELECTION or AT USER-COMMAND.

Use TOP-OF-PAGE DURING LINE-SELECTION for page headers on detail lists.

Each detail list event exists only once in the program and is shared by all detail lists. You must therefore ensure yourself, within the processing block, that the correct list is created. To do this, use a CASE structure that uses the system field sy-lsind. This system field contains the list index of the list that you are currently generating.Use the statement HIDE global_field to store the contents of the global data field global_field for the current line.

If the user selects the line, the data field is automatically filled with the value that you retained for the line.You do not have to display the field on the list in order to retain its value using HIDE.The field can be a structure. However, deep structures (structures containing internal tables as components) are not supported.

When the user selects a line on an interactive list, all of the global data fields whose values you stored using the HIDE statement while you were creating the basic list are filled with those values.The line selection is based on the cursor position when the AT LINE-SELECTION and AT USERCOMMAND events occur. (system field sy-lilli).

If you choose a line using the READ LINE... statement, the values are placed back in the original fields according to the line numbers.To check whether the user selected a valid line, you can use the fact that the hide area only contains data for valid lines. When you have finished creating the list, initialize a suitable test field. This allows you to check before you create the detail list whether a value from the hide area has been placed in the test field.

Once you have created the detail list, re-initialize the test field to ensure that the user cannot choose an invalid line once he or she returns from the detail list and attempts to select another line for a new detail list.

RELATED POSTS

LESSON 36 PROGRAM INTERFACE

MySAP CRM System architecture and design
MySAP CRM architecture and E procurement introduction