SAP ABAP programming report provides a summarized list of production orders based on user specified criteria. It is a powerful tool for monitoring the progress of orders through the production process, both from a manufacturing and an accounting perspective.
From this report, you can drill down to the order in display or change mode. The report also lets you display the dependent demand for components and the pegging reports to the demand source. For a configured product, it lets you drill down to the details of the configuration.
There are some additional flags such as component storage location, deletion indicator, and rework and collective order indicators which may further filter the selection. Since a production order database can be very large, it is advisable to use the filters provided in the first section to limit data selection and improve performance. All filters and settings may be saved for future use as a variant.
The report provides three basic views:
1. Object overview (MRP controller, plant, order type, system status, basic dates)
2. Order header overview (all header-level dates, last changed by, material description)
3. Object detail list (based on objects chosen, displays/groups related fields; see below) Use of the standard profile will list a predefined set of fields for each order, but these may be changed for the particular session, or a new profile may be created for the future.
This report contains data obtained from production orders. There are two cases in which data may be changed:
1. An order brought up in change mode from the menu option (Environment → Change order; an icon is also provided).
2. By choosing Goto → Object detail list → Components you are provided various branch points under the subsequent Environment menu, including the ability to change the order, create and process pick lists (goods issues) and invoke backorder processing.
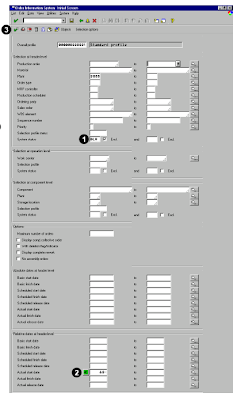
To access the first screen for this report, choose Logistics → Production → Production control → Control → Information systems → Order Info system → Object overview.
1. Select the standard profile in Overall profile.
2. Enter 3000 in Plant.
3. Choose List → Execute.
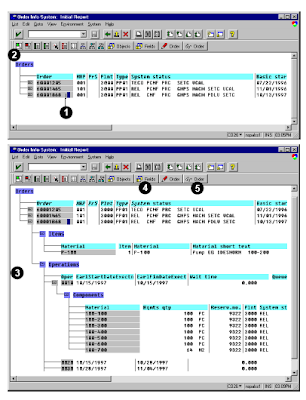
 This screen shows the Object Overview. The orders are listed along with the various status codes from the order. Click the node to expand the line entry.
 1. Enter DLV in System status and then, select Excl. (exclude). This selection assures that the report will ignore orders that are “technically completed.”
2. Under Relative dates at header level enter the number of days (plus or minus) from the current day. Combining the number of days (for example, 60) with the selection option of less than (<) selects orders started more than 60 days ago. 3. Choose Execute.
 This screen shows the list restricted to orders that do not have the DLV status. The actual start date for these orders is more than 60 days ago.
1. Click the node for the production order you want to expand on.
2. Select the expand node button to display a full listing for the order.
3. Each subordinate object can be expanded to reveal more detail.
4. Choose Fields to modify individual columns.
5. The individual order can be displayed or changed by selecting the appropriate menu choice or
icon. The cursor is placed on the order to display or change, then the icon is selected. In this example, we choose Display order.


